Preventing users from changing proxy settings in Windows 11 is extremely important for an organization, school, or public network to maintain security, data control, and network policy. If you want to ensure that users connected to your network cannot change proxy settings, there are some precise and effective ways to do it in Windows 11. In this article, we will explain all the methods in detail that will help you make your system more secure and controlled.
Lock Proxy Settings using Group Policy Editor (for Pro and Enterprise versions)
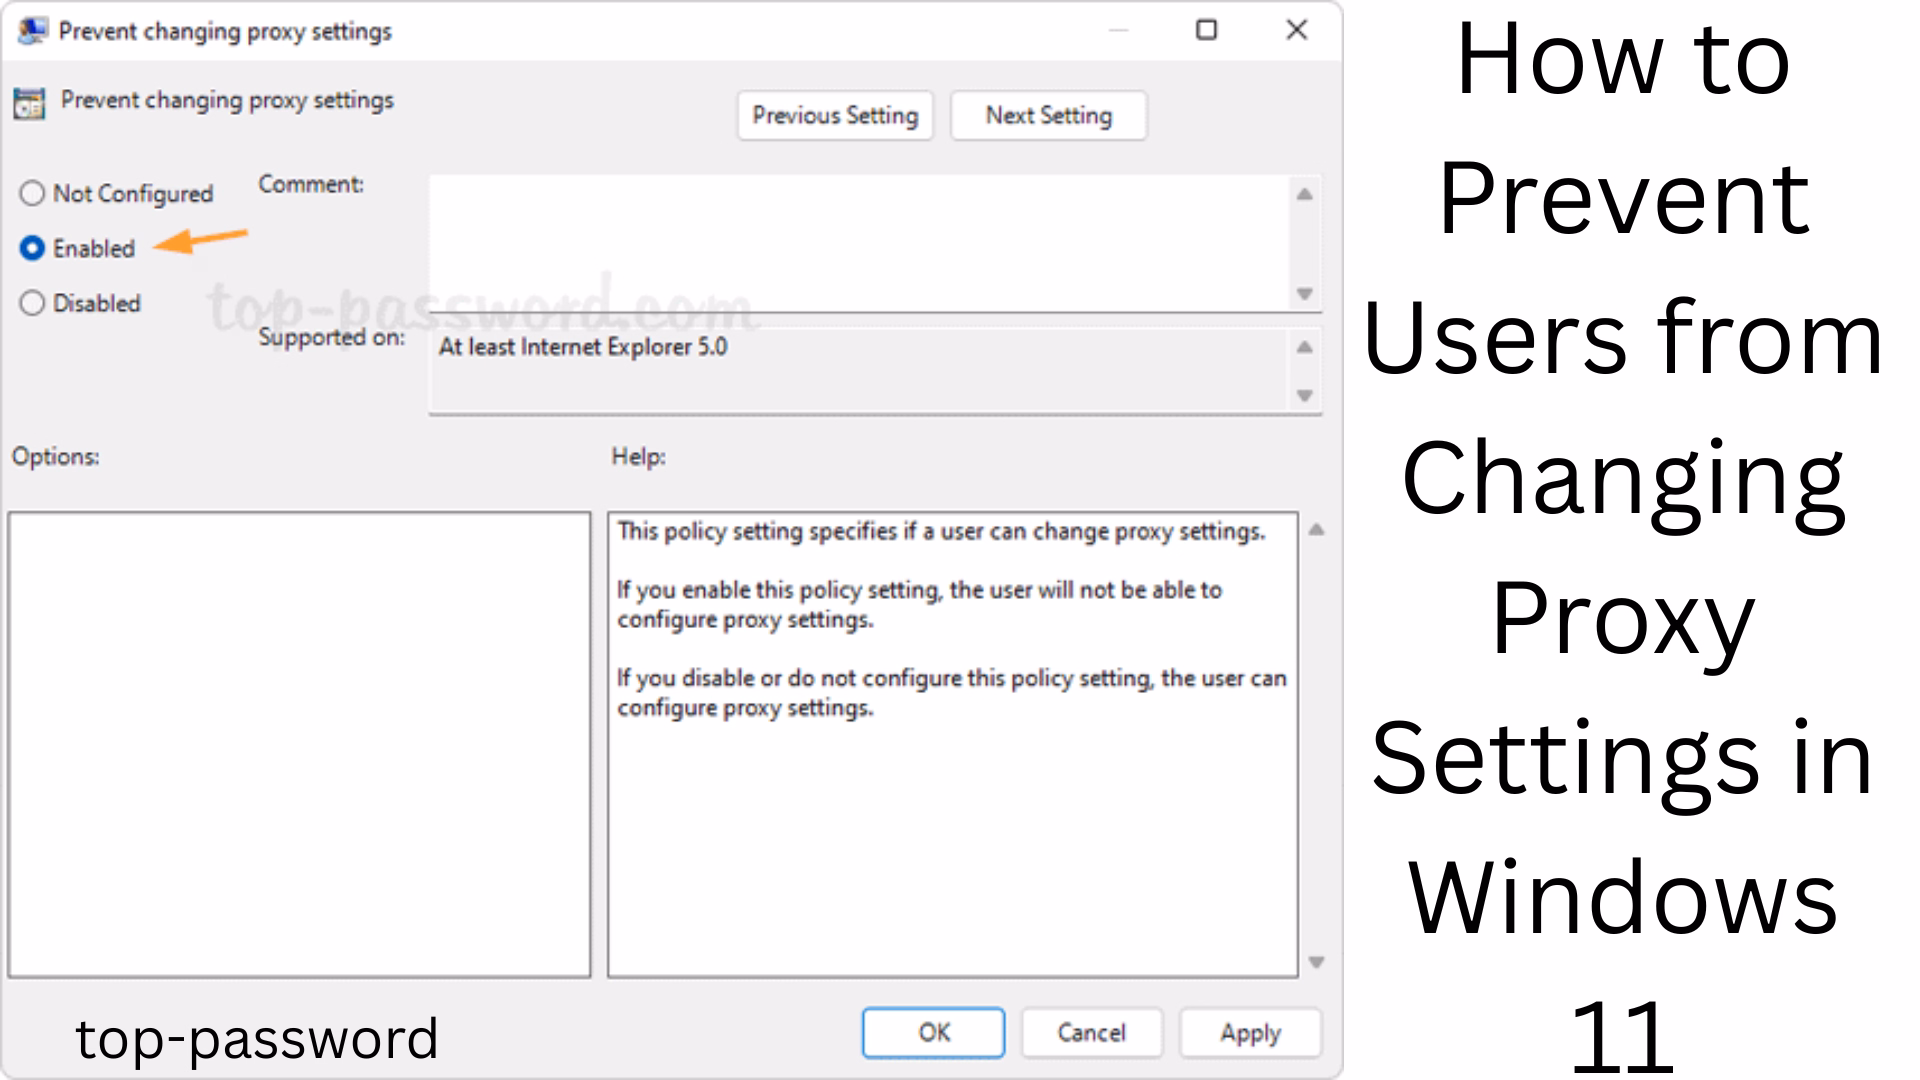
If you are using Windows 11 Pro, Enterprise, or Education version, you can prevent proxy settings from being changed with the help of the Group Policy Editor.
Step 1: Open Group Policy Editor
Go to Start Menu and type `gpedit.msc`
Press Enter and open the Group Policy Editor
Step 2: Find the Network Settings policy
> User Configuration > Administrative Templates > Windows Components > Internet Explorer > Internet Control Panel > Connections Page
Step 3: Disable Proxy Settings
Double click on “Disable the Connections page.”
Set it to Enabled
Click Apply > OK
This will prevent users from accessing the Connections tab of Internet Options, where proxy settings are changed.
Prevent changes to Proxy Settings via Registry Editor (for all Windows versions)
If you have Windows 11 Home version, you cannot use Group Policy Editor, but you can do the same thing from Registry Editor.
Warning: Make sure to back up the Registry before making changes.
Step 1: Open Registry Editor
Type `regedit` in the Start Menu
Press Enter to open Registry Editor
Step 2: Go to the location of proxy settings
> HKEY\_CURRENT\_USER\Software\Policies\Microsoft\Internet Explorer\Control Panel
> If this key (Control Panel) does not exist, create it yourself:
Right click on `Internet Explorer` > New > Key > Name it `Control Panel`
Step 3: Disable proxy settings
Right click on `Control Panel` > New > DWORD (32-bit) Value
Name it Proxy
Double click and set Value Data to 1
Press OK
Now, users will not be able to change the system proxy settings.
Allow only the network administrator to change proxy settings
If you want only administrators to change proxy settings and not other users, you can do the following:
Step 1: Set proxy settings once
Go to Settings > Network & Internet > Proxy and enter manual proxy settings
Then lock it using Registry Editor or Group Policy as mentioned above
Step 2: Turn off proxy services (Optional)
> Open Services.msc and disable Web Proxy Auto-Discovery Service so that the system cannot discover any other proxy.
Locking Proxy with PowerShell Script
If you are an IT admin and need to apply this setting on multiple systems, a PowerShell Script is a great solution.
“`powershell
Set-ItemProperty -Path “HKCU:\Software\Policies\Microsoft\Internet Explorer\Control Panel” -Name Proxy -Value 1
“`
This script locks down the proxy by directly changing the registry.
Block access from Windows Settings
Step 1: Block the Settings App
If you want to prevent any user from accessing Windows Settings:
Open Group Policy Editor
> User Configuration > Administrative Templates > Control Panel
Enable “Prohibit access to Control Panel and PC settings.”
This setting will not allow the user to access the entire Settings app.
Use Software Restriction Policies
You can block specific .exe files like `inetcpl.cpl` (Internet Options) with Software Restriction Policies so that users will not be able to access the proxy settings.
Step 1: Go to Group Policy Editor
> Computer Configuration > Windows Settings > Security Settings > Software Restriction Policies
Create a New Software Restriction Policy
Block `inetcpl.cpl` in Additional Rules
Create an Auto Proxy Reset Script using Task Scheduler
If users somehow manage to change the settings, you can create an automated script that resets the settings every time they log on.
Script example:
“`powershell
$regPath = “HKCU:\Software\Microsoft\Windows\CurrentVersion\Internet Settings”
Set-ItemProperty -Path $regPath -Name ProxyEnable -Value 1
Set-ItemProperty -Path $regPath -Name ProxyServer -Value “127.0.0.1:8080”
“`
Add this script to Task Scheduler with an “At logon” trigger.
Conclusion: Why it is necessary to lock proxy settings in Windows 11
It is very important to prevent users from changing proxy settings for network security and data control. By following the above methods, you can completely control proxy settings in Windows 11 and protect your system from unwanted changes.
Want to grow your website organically? Contact us now
Frequently Asked Questions (FAQ) – How to prevent users from changing proxy settings in Windows 11
Question 1: Can I lock proxy settings in Windows 11 Home version, too?
Answer: Yes, you can lock proxy settings in Windows 11 Home version too, using Registry Editor, as Group Policy Editor is not available in it.
Question 2: What will users not be able to do by locking proxy settings?
Answer: Users will not be able to change proxy settings by going to Internet Options > Connections > LAN Settings or Settings > Network & Internet > Proxy. This maintains network security.
Question 3: Can proxy settings be controlled automatically from PowerShell?
Answer: Yes, you can set or lock proxy settings using PowerShell scripts and apply it on every logon using Task Scheduler.
Question 4: Can proxy settings be locked on multiple users’ systems?
Answer: Yes, if you are an IT admin, you can apply these settings to multiple systems at once via Group Policy, PowerShell scripts, or Registry export.
Question 5: Can users change proxy settings with third-party apps?
Answer: If you have locked settings via Registry and Group Policy, third-party apps generally cannot change those settings. However, if the user has admin rights, they can bypass this.
Question 6: Can the Settings app be completely blocked?
Answer: Yes, you can block both the Settings app and Control Panel via Group Policy so that users cannot make any changes to system settings.
Question 7: Can only a certain user be allowed to change the proxy?
Answer: Yes, you can lock proxy settings for other users and only allow changes to the admin user account.