Why You Might Need to Uninstall Windows 11 Updates
Windows 11 regularly receives Security Updates, Feature Updates, and Quality Updates. While these updates often improve system security and performance, in some cases, they can cause problems such as a slow PC, software compatibility issues, boot errors, Blue Screen of Death (BSOD), or hardware driver problems. In such situations, manually uninstalling Windows 11 updates becomes an effective solution.
Here, we explain all the manual and advanced methods for removing updates in Windows 11 in detail so that you can restore your system’s stability in any situation.
Understanding the Type of Windows 11 Update is Important
Before uninstalling an update, it’s crucial to know what type of update you have installed:
Quality Updates – Monthly security and bug fixes
Feature Updates – Major version updates (e.g., 22H2, 23H2)
Driver Updates – Updates related to hardware drivers
The method for removing each type of update may vary slightly.
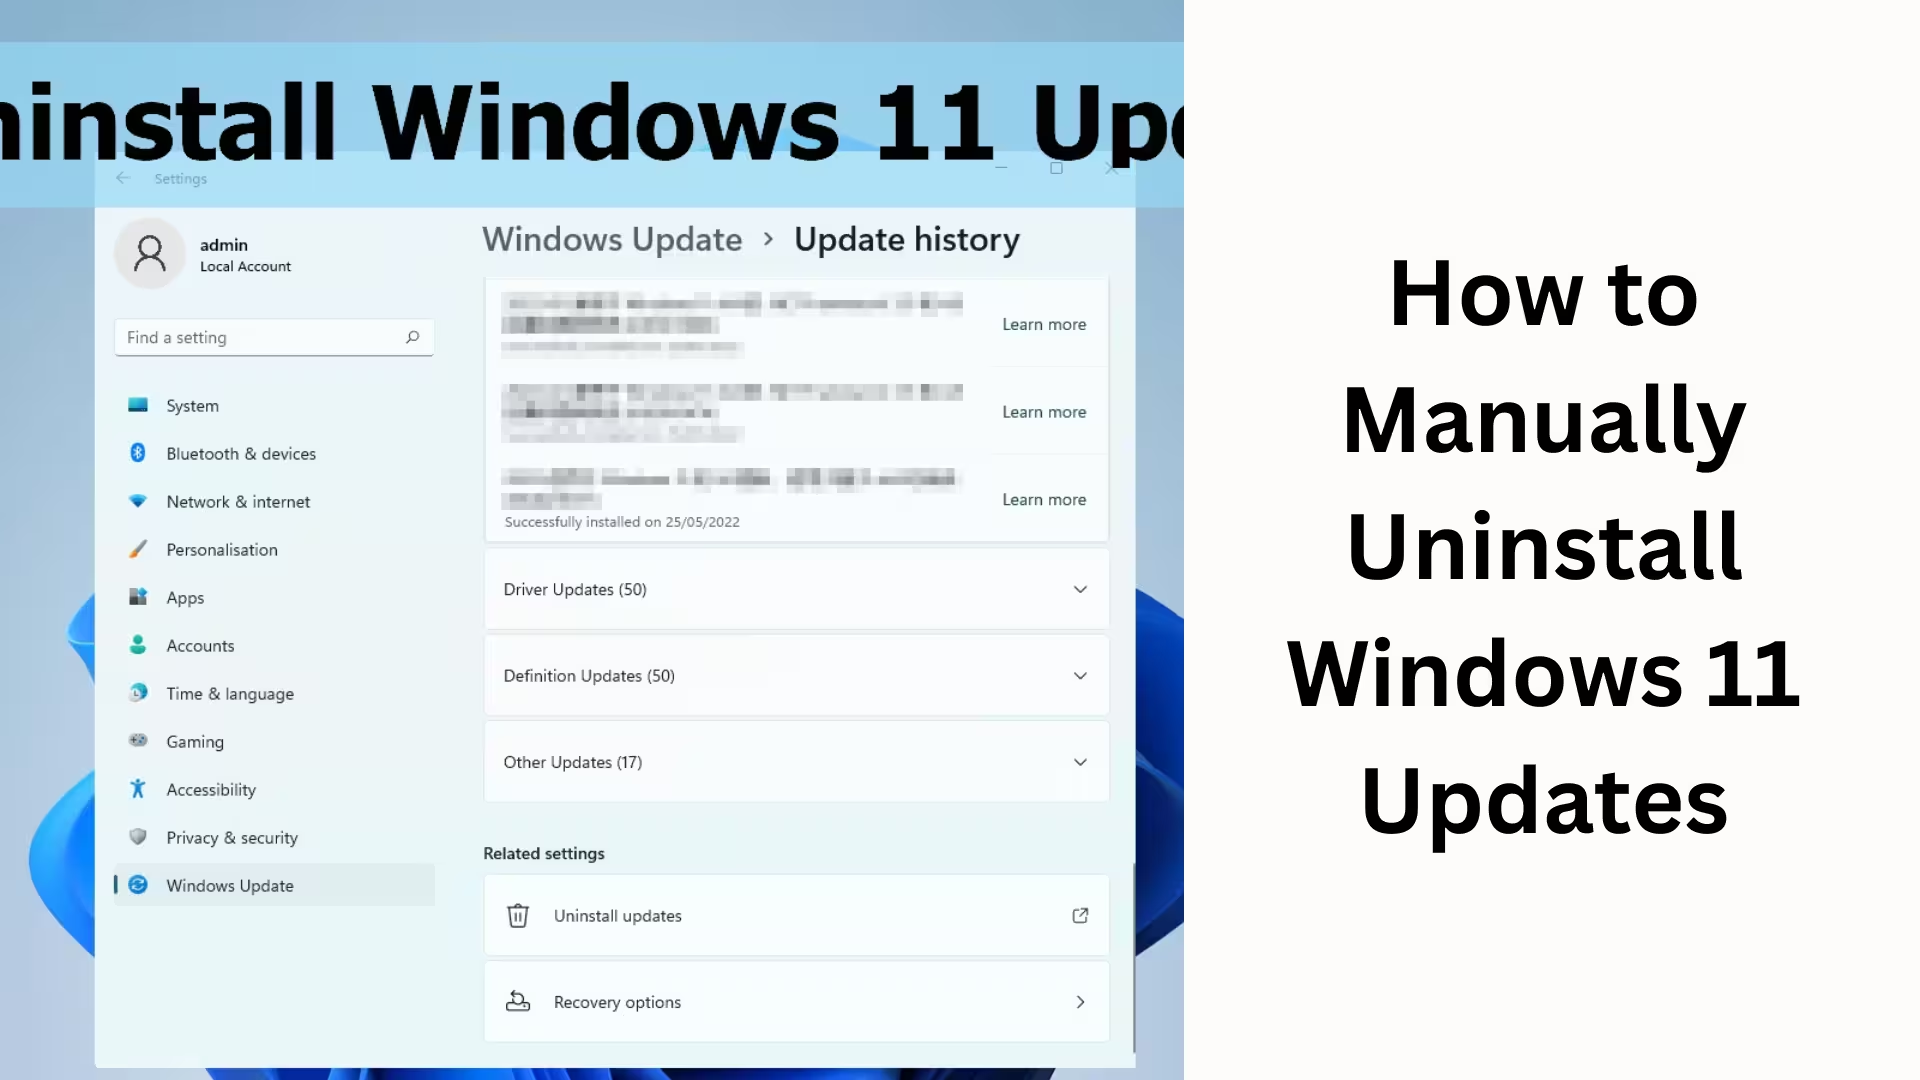
Method 1: Uninstall Windows 11 Updates from Settings
This is the easiest and safest method.
Step-by-Step Process
1. Open the Start Menu
2. Click on Settings
3. Go to the Windows Update section
4. Click on Update History
5. Scroll down and select Uninstall Updates
6. Select the update with the corresponding KB Number
7. Click the Uninstall button
8. Restart your system
This method is most effective for Quality Updates and Security Updates.
Method 2: Remove Windows 11 Updates from the Control Panel
Many users find the older interface more reliable.
Complete Method
1. Open the Control Panel
2. Go to Programs > Programs and Features
3. Click on View Installed Updates on the left side
4. A list of all installed updates will appear
5. Select the problematic update
6. Click Uninstall at the top
7. Restart your system after the process is complete
This method is especially useful when the Settings app is not working correctly. Method 3: Uninstall Updates using Command Prompt (CMD)
This method is for advanced users.
Uninstalling via CMD
1. Search for CMD in the Start Menu
2. Select Run as Administrator
3. Type the following command:
“`
wusa /uninstall /kb:KBNumber
“`
Example:
“`
wusa /uninstall /kb:5021234
“`
4. Press Enter
5. Follow the on-screen instructions
6. Restart your system
This method is fast and accurate, especially when the GUI is not working.
Method 4: Remove Windows 11 Updates from Advanced Startup
If your system is not booting, this method is the best.
Steps
1. Restart your PC
2. During boot, turn off the system 2-3 times by pressing the Power button
3. The Automatic Repair screen will open
4. Select Advanced Options > Troubleshoot
5. Go to Advanced Options > Uninstall Updates
6. Select the Latest Quality Update or Feature Update
7. Follow the instructions
This method is very effective for boot loops and startup errors.
Method 5: Uninstall Updates in Safe Mode
In Safe Mode, only essential files are loaded.
Uninstalling from Safe Mode
1. Open Advanced Startup Options
2. Go to Startup Settings > Restart
3. Press F4 or F5 to select Safe Mode
4. Now, remove the update from the Control Panel or CMD
This method is useful when the system is freezing in Normal Mode.
How to Rollback a Feature Update
If you have recently installed a new Windows 11 version:
Rollback Steps
1. Go to Settings > System > Recovery
2. Click on the Go Back option
3. Select a reason
4. Follow the instructions
This option is only available for 10 days. How to Block Windows Updates After Uninstalling an Update
To prevent the same update from reinstalling repeatedly:
Use Pause Updates
Block the update using the Show or Hide Updates Tool
Use the Group Policy Editor (Pro Version)
Common Errors and Their Solutions
Update Uninstall Failed – Use Safe Mode or CMD
KB Update Not Listed – It might be a Feature Update
System Crash After Uninstall – Perform a System Restore
Important Precautions
Create a System Restore Point before uninstalling
Back up your important data
Only remove the update that is causing the problem
Conclusion
Uninstalling updates in Windows 11 is not a difficult process if the correct method is followed. We have explained all the effective methods in detail here, including Settings, Control Panel, CMD, Safe Mode, and Advanced Startup. By selecting the right method, you can permanently resolve your system’s issues and restore Windows 11 to a stable and smooth state.
Want to grow your website organically? Contact us now
Frequently Asked Questions (FAQ) – Questions related to Windows 11 Update Uninstall
Is it safe to uninstall updates in Windows 11?
Yes, uninstalling updates in Windows 11 is completely safe, provided you only remove the update that is causing the problem. Microsoft itself provides the Uninstall option in the Update History, which makes it an official and safe process.
Which updates can be uninstalled in Windows 11?
In Windows 11, the following updates can primarily be uninstalled:
Quality Updates
Security Updates
Cumulative Updates
However, Feature Updates cannot be uninstalled directly; they can only be rolled back.
What is a KB Update Number, and where can I find it?
The KB (Knowledge Base) Number is a unique number for every Windows Update.
You can find it here:
Settings > Windows Update > Update History
Here you will find the KB Numbers of all installed updates.
How to remove an update if Windows 11 is not booting?
If the system is not starting, you can:
Use Advanced Startup Options
Use Automatic Repair Mode
to uninstall the latest Quality Update or Feature Update. This method is most effective in case of boot loops and startup errors.
Is it correct to uninstall Windows 11 updates using CMD?
Yes, uninstalling updates using Command Prompt (CMD) is a perfectly valid and fast method. This method is especially useful when:
The Settings app is not working
The Control Panel is not opening
Advanced-level troubleshooting is required
Why does the same update get reinstalled after uninstalling it?
The same update may be reinstalled due to Windows 11 Automatic Updates being enabled. To prevent this:
Pause Updates
Use the Show or Hide Updates Tool
Block updates using Group Policy Editor
For how many days can a Feature Update be rolled back?
In Windows 11, the option to roll back a Feature Update is available for only 10 days after installation. After that, the old system files are automatically deleted.
Why is it necessary to uninstall updates in Safe Mode?
In Safe Mode, only essential system files are loaded, which prevents:
Third-party software interference
Allows for easy uninstallation of updates
This method is very useful for resolving system freezes and crash issues.
Does uninstalling an update delete data?
No, uninstalling an update does not delete personal files such as documents, photos, and videos. However, it is always recommended to create a safety backup.
What to do if you get a Windows 11 Update Uninstall Failed error?
If the uninstallation fails:
Try in Safe Mode
Use CMD (Run as Administrator)
Use System Restore
Is it okay to remove all Windows 11 updates?
No, it is not advisable to remove all updates. Security updates keep your system secure. Only uninstall updates that are causing:
Performance issues
Software compatibility problems
System crashes
or similar problems.