What is Hyper-V in Windows 11?
Hyper-V is a powerful virtualization technology developed by Microsoft, which is pre-installed in Windows 11. It allows users to run virtual machines on a single system. However, sometimes Hyper-V can cause software like VMware, VirtualBox, Android Emulator, and Bluestacks to malfunction or affect gaming performance. In such situations, disabling Hyper-V becomes necessary.
Why do you need to disable Hyper-V in Windows 11?
Compatibility issues with third-party virtualization software
To improve gaming performance
To run Android emulators or other developer tools
To reduce CPU and RAM usage
To free the system from low-level virtualization
Things to consider before disabling Hyper-V in Windows 11
You must have Administrator access to your system
A PC restart is required after making the changes
If you want to use Hyper-V again in the future, the process can be reversed
Also read: How to Run Troubleshooter in Windows 11: A Complete Guide to Fixing Various Problems
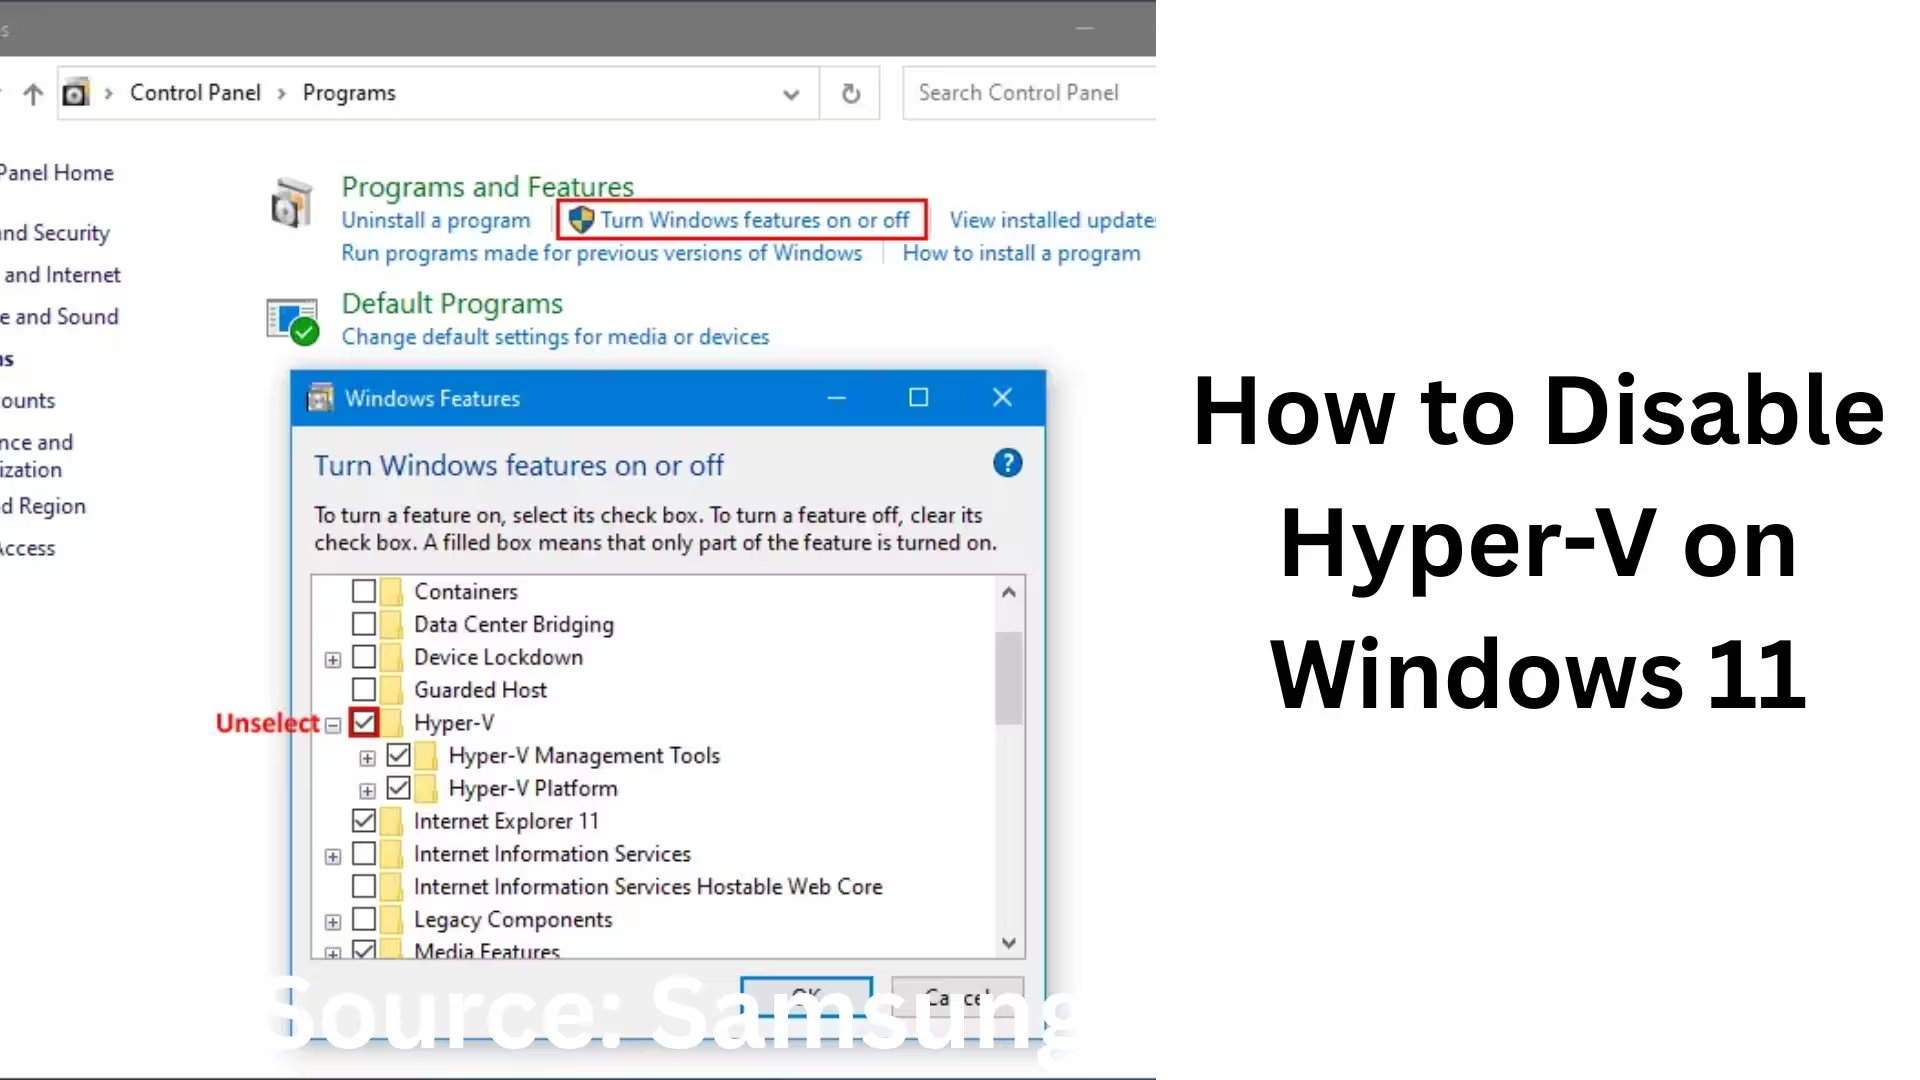
Method 1: Disable Hyper-V from Windows Features
This is considered the easiest and safest method.
Step-by-step process
1. Click on the Start Menu
2. Search for and open Control Panel
3. Go to Programs > Programs and Features
4. Click on Turn Windows features on or off on the left side
5. Find Hyper-V in the list
6. Uncheck the checkbox next to Hyper-V
7. Click OK
8. Restart your system
After the restart, Hyper-V will be completely disabled.
Method 2: Disable Hyper-V using Command Prompt
This method is more effective for advanced users. Steps
1. Open the Start Menu
2. Search for cmd
3. Select Run as Administrator
4. Type the following command:
“`
bcdedit /set hypervisorlaunchtype off
“`
5. Press Enter
6. Restart your system
This command disables Hyper-V at the Windows Boot Level.
Method 3: Disable Hyper-V using Windows PowerShell
PowerShell is a powerful tool that allows you to disable Hyper-V more thoroughly.
Procedure
1. Open the Start Menu
2. Search for Windows PowerShell
3. Click on Run as Administrator
4. Run this command:
“`
Disable-WindowsOptionalFeature -Online -FeatureName Microsoft-Hyper-V-All
“`
5. Restart your system after the process is complete
Method 4: Disable Hyper-V using Group Policy Editor
This method is specifically for Windows 11 Pro and Enterprise users.
Steps
1. Press Win + R
2. Type gpedit.msc and press Enter
3. Navigate to:
“`
Computer Configuration > Administrative Templates > System > Device Guard
“`
4. Double-click on Turn On Virtualization-Based Security
5. Set it to Disabled
6. Click Apply > OK
7. Restart your system
Method 5: Disable Virtualization-Based Security (VBS)
Sometimes, even after disabling Hyper-V, VBS remains enabled, which can cause the problem to persist. Steps to Disable VBS
1. Open Windows Security
2. Click on Device Security
3. Open Core Isolation details
4. Turn off Memory Integrity
5. Restart your system
How to Check if Hyper-V is Disabled
Check using Task Manager
1. Press Ctrl + Shift + Esc
2. Open the Performance tab
3. Look in the CPU section
4. If it says Virtualization: Disabled, then Hyper-V is turned off
Benefits of Disabling Hyper-V
VMware and VirtualBox will run without errors
Bluestacks and Android Emulators will run smoothly
Improved Gaming FPS and Stability
Better Low-Level System Performance
Reduced CPU Overhead
How to Re-enable Hyper-V
If needed in the future, re-enabling Hyper-V is also easy.
Enable using Command Prompt
“`
bcdedit /set hypervisorlaunchtype auto
“`
After restarting, Hyper-V will be active again.
Does the Home Edition have Hyper-V?
Windows 11 Home does not have Hyper-V available by default, but some features can be activated through VBS.
Conclusion
Disabling Hyper-V in Windows 11 can be crucial for users who use third-party virtual machines, emulators, or high-performance gaming. All the methods mentioned above are professional, safe, and effective. Depending on your needs, you can use any of these methods to completely disable Hyper-V and improve your system’s performance.
Are you searching for the best hosting plan? Click now and get 20% off
Frequently Asked Questions (FAQ)
1. What is Hyper-V in Windows 11?
Hyper-V is a virtualization technology from Microsoft that allows you to run multiple virtual machines on a single computer.
2. Why do I need to disable Hyper-V?
When Hyper-V is enabled, applications like VMware, VirtualBox, Bluestacks, Android Emulators, and many games may not function correctly. Disabling it improves performance and compatibility.
3. Does disabling Hyper-V harm the system?
No, disabling Hyper-V is completely safe and does not affect Windows 11 system files or updates.
4. Will VMware and VirtualBox work after disabling Hyper-V?
Yes, after disabling Hyper-V, VMware, and VirtualBox will work smoothly without any errors.
5. Does Windows 11 Home have Hyper-V?
Hyper-V is not fully available in Windows 11 Home, but some features may be active due to Virtualization Based Security (VBS) and Memory Integrity.
6. Is a PC restart necessary after disabling Hyper-V?
Yes, a restart is mandatory because Hyper-V operates at the boot level.
7. Does disabling Hyper-V improve gaming performance?
Absolutely, disabling Hyper-V reduces CPU overhead, resulting in improved FPS, stability, and overall gaming performance.
8. How can I verify that Hyper-V is completely disabled?
You can confirm this by checking Task Manager > Performance > CPU section, where it should show Virtualization: Disabled.
9. Can Hyper-V be re-enabled later?
Yes, Hyper-V can be re-enabled at any time. It only requires a command and a restart.
10. Will Windows Update work after disabling Hyper-V?
Yes, Windows Update will continue to work normally; Hyper-V does not negatively affect it.
11. Are Hyper-V and Memory Integrity different?
Yes, but they are related. In many cases, disabling Hyper-V also requires turning off Memory Integrity.
12. Is it necessary to disable Hyper-V for Android emulators?
In most cases, yes. Emulators like Bluestacks, LD Player, and Nox Player perform better with Hyper-V disabled.
13. Does disabling Hyper-V completely disable virtualization?
No, the hardware virtualization (Intel VT-x / AMD-V) in the BIOS remains enabled, allowing other software to function correctly.
14. Is disabling Hyper-V necessary for all users?
No, if you use a Virtual Machine or Windows Sandbox, Hyper-V can be useful for you.
15. What is the easiest way to disable Hyper-V?
The easiest way is to uncheck the Hyper-V checkbox in Windows Features > Turn Windows features on or off.