In Windows 11, Microsoft has introduced several features designed to enhance system stability and streamline the update process. One such feature is Reserved Storage. This feature pre-allocates a portion of storage space on the system drive to ensure that sufficient room remains available for Windows Updates, temporary files, and essential system processes.
However, for many users—particularly those with systems equipped with SSDs or limited storage capacity—this feature can become a source of inconvenience. If you wish to reclaim additional storage space on your computer, disabling Reserved Storage can be a practical solution.
In this guide, we will explore how to disable Reserved Storage on Windows 11, what Reserved Storage entails, the benefits of turning it off, and the various methods for doing so.
What is Reserved Storage?
Reserved Storage is a built-in feature of Windows 11 that reserves a specific amount of storage space for system updates and critical system files.
When this feature is active, Windows typically sets aside approximately 7GB or more of storage space exclusively for its own use. This reserved space is generally inaccessible to the user for standard file storage.
The Primary Objectives of Reserved Storage:
To ensure the successful installation of Windows Updates
To store temporary files
To maintain system stability
To mitigate issues related to low storage capacity
What Happens When You Disable Reserved Storage?
Once Reserved Storage is disabled, the space previously reserved by the system gradually becomes available, allowing you to utilize it for your own files, applications, or other data.
Benefits:
You gain access to additional storage space.
More available space becomes accessible on computers equipped with smaller SSD drives.
Issues related to limited disk space are alleviated.
Potential Drawbacks:
Significant storage space may be required when installing major Windows Updates.
You may encounter issues during the update installation process if there is insufficient storage space available.
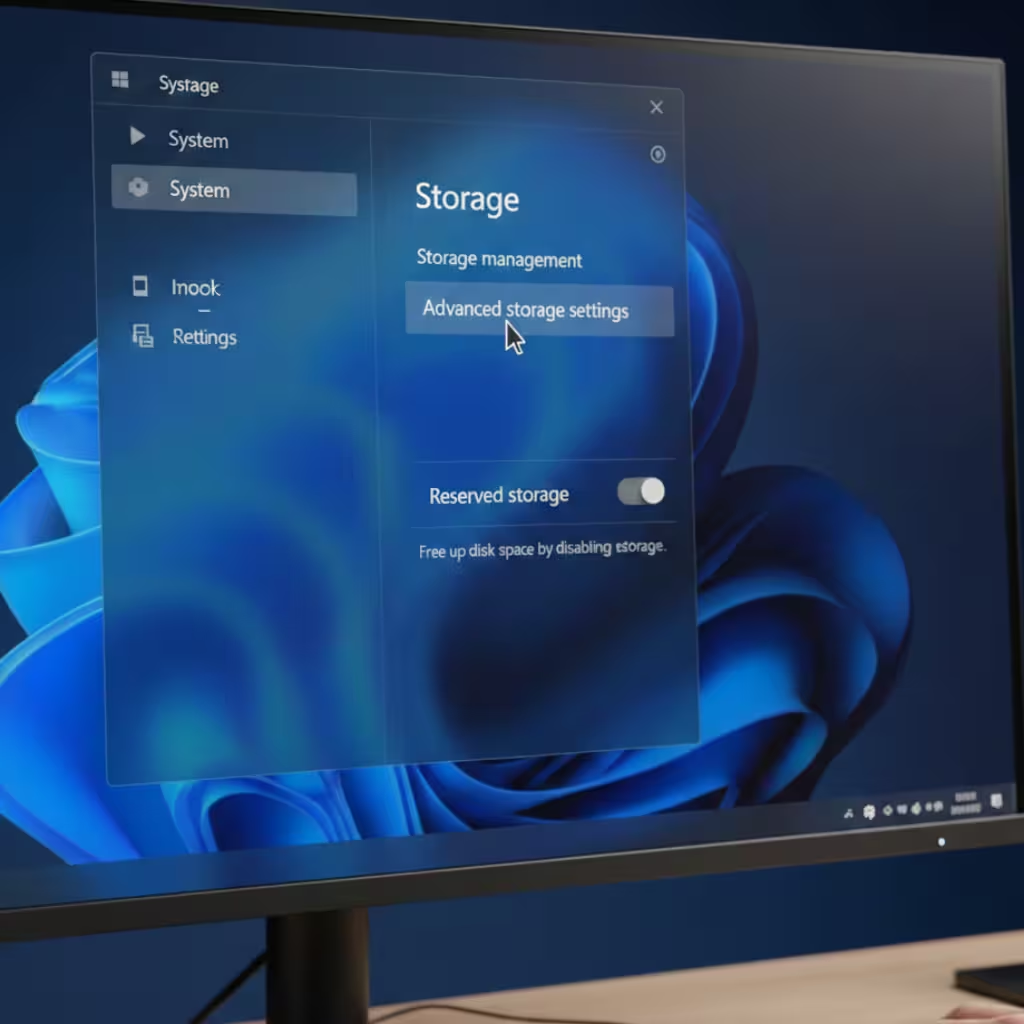
How to Check the Status of Reserved Storage in Windows 11
Before proceeding to disable Reserved Storage, it is advisable to first verify whether or not it is currently active on your system.
Step 1
Open Settings.
Step 2
Click on System. Step 3
Select the Storage option.
Step 4
Open Advanced Storage Settings.
Step 5
Look for the Storage used on other drives or the System & reserved section.
If Reserved Storage is active, its details may appear here.
Also read: How to Password Protect PDF Files on Windows 11?
Disable Reserved Storage using the Registry Editor
The most popular method to disable Reserved Storage in Windows 11 is by using the Registry Editor.
Step 1: Open Registry Editor
Press Windows + R.
Type `regedit` in the Run box.
Press Enter.
Step 2: Navigate to the Registry Location
Go to the following path:
`HKEY_LOCAL_MACHINE\SOFTWARE\Microsoft\Windows\CurrentVersion\ReserveManager`
Step 3: Change the `ShippedWithReserves` Value
On the right side, locate the entry named `ShippedWithReserves`.
Double-click on it.
Change the Value Data from `1` to `0`.
Click OK.
Step 4: Restart the System
Restart your computer.
Reserved Storage does not disappear immediately after a restart. The reserved storage may be gradually removed during the next Windows Update process or system maintenance cycle.
Check Reserved Storage Status using the DISM Command
If you wish to check the status of Reserved Storage via the command line, you can use the DISM tool.
Open Command Prompt as an Administrator.
Then, run this command:
`DISM /Online /Get-ReservedStorageState`
This command will display the current status of Reserved Storage.
If Reserved Storage is enabled, the relevant details will appear in the output.
Retrieve Reserved Storage Information using PowerShell
For PowerShell users, retrieving information about Reserved Storage is also a straightforward process.
Open PowerShell.
Run PowerShell in Administrator Mode to retrieve the necessary system information.
This method is particularly useful for IT administrators and advanced users.
How much space will be reclaimed after disabling Reserved Storage?
This depends on your specific Windows version and the language packs currently installed on your system. Generally:
System Configuration | Estimated Reserved Storage
Base Windows 11 | 7GB
Additional Language Packs | 8GB to 10GB
Including Optional Features | 10GB+
If Reserved Storage is disabled, this space may gradually become available.
Also read: 7 Best Ways to Fix Steam Unable to Verify Email Address.
How to Re-enable Reserved Storage
If you wish to re-enable Reserved Storage in the future, use the same Registry Key.
Registry Path:
HKEY_LOCAL_MACHINE\SOFTWARE\Microsoft\Windows\CurrentVersion\ReserveManager
Change the Value:
ShippedWithReserves
0 → 1
Afterward, restart your computer.
Points to Consider Before Disabling Reserved Storage
Before turning off Reserved Storage, you should consider a few important points.
Maintain Sufficient Free Space
If your drive is nearly full, Windows Updates may be affected.
Perform Regular Disk Cleanup
Utilize the Storage Sense and Disk Cleanup tools.
Delete Temporary Files
Periodically remove unnecessary files.
Check Storage Space Before Major Updates
Ensure sufficient storage is available before installing Feature Updates.
Other Ways to Increase Storage Space in Windows 11
In addition to disabling Reserved Storage, the following measures may also prove useful:
Enable Storage Sense
Windows automatically deletes temporary files.
Empty the Recycle Bin
The Recycle Bin often accumulates a large amount of data.
Remove Unused Applications
Uninstall software that is no longer needed.
Clean Up the Downloads Folder
Delete old downloaded files.
Use External Storage
Transfer large media files to an external drive.
What to Do If Reserved Storage Won’t Disable?
If Reserved Storage still appears even after making the necessary changes:
Run Windows Update.
Restart your system.
Perform a Storage Cleanup.
Wait for a few days.
Install the latest Windows Updates.
In many cases, Reserved Storage is not removed immediately; instead, it is cleared during the next system maintenance cycle.
Conclusion
In Windows 11, Reserved Storage reserves space for system updates and critical processes; however, for users with limited storage capacity, it can occupy a significant amount of space. Reserved Storage can be easily disabled via the Registry Editor, allowing you to reclaim a few extra gigabytes of storage space.
If your system consistently maintains sufficient free space and you wish to make more storage available, disabling Reserved Storage can be an effective solution. However, it is always essential to maintain adequate free space to ensure that Windows Updates run smoothly.
Also read: WhatsApp Username: How to Hide Your Phone Number
FAQ (Frequently Asked Questions)
1. What is Reserved Storage in Windows 11?
Reserved Storage is a feature in Windows 11 that pre-allocates a certain amount of storage space for system updates, temporary files, and other essential system processes.
2. Is it safe to disable Reserved Storage?
Yes, for most users, it is safe to disable Reserved Storage. However, it is essential to ensure that sufficient free storage is available during Windows Updates.
3. How much space does Reserved Storage consume?
Typically, Reserved Storage can consume approximately 7GB or more of storage space. This depends on the system configuration and the features currently installed.
4. How do I disable Reserved Storage in Windows 11?
You can disable Reserved Storage by navigating to the Registry Editor and changing the ShippedWithReserves value—located at the path `HKEY_LOCAL_MACHINE\SOFTWARE\Microsoft\Windows\CurrentVersion\ReserveManager`—from 1 to 0.
5. Does disabling Reserved Storage free up space immediately?
No, the storage space does not become available immediately after disabling Reserved Storage. This space may be freed up gradually following a Windows Update or system maintenance.
6. Can Reserved Storage be re-enabled?
Yes, you can re-enable it by changing the value of ShippedWithReserves in the Registry Editor back from 0 to 1, and then restarting your system.
7. How do I check the status of Reserved Storage?
You can run the following command in the Command Prompt (in Administrator Mode):
“`cmd
DISM /Online /Get-ReservedStorageState
“`
This command will display the current status of Reserved Storage.
8. Does disabling Reserved Storage affect Windows Updates?
If your system has sufficient free storage, disabling Reserved Storage generally does not negatively impact Windows Updates. However, if storage is limited, you may encounter issues installing updates.
9. Is Reserved Storage available in all Windows 11 editions?
Reserved Storage is available in most modern Windows 11 installations; however, its status may vary in certain custom-built or older upgraded systems.
10. How much additional space can be gained by disabling Reserved Storage?
In most cases, an additional 7GB to 10GB of storage space may become available, depending on your system’s settings and installed features.


