Windows 11 is a modern and smart operating system that offers several advanced features to improve user experience, performance, and productivity. When we use the same apps every day, manually opening them each time the system starts becomes a time-consuming task. Automatically launching apps at startup is the most effective solution.
Here, we are explaining 5 of the best and most reliable ways to launch apps at startup in Windows 11 in detail. This guide is completely step-by-step, practical, and useful for all users.
What are Startup Apps and why are they important?
Startup apps are applications that automatically run as soon as Windows 11 boots up. This results in:
Saving time
Starting daily tasks faster
Increased productivity
No need to open apps repeatedly
However, it is crucial to only include the necessary apps in the startup to prevent the system from slowing down.
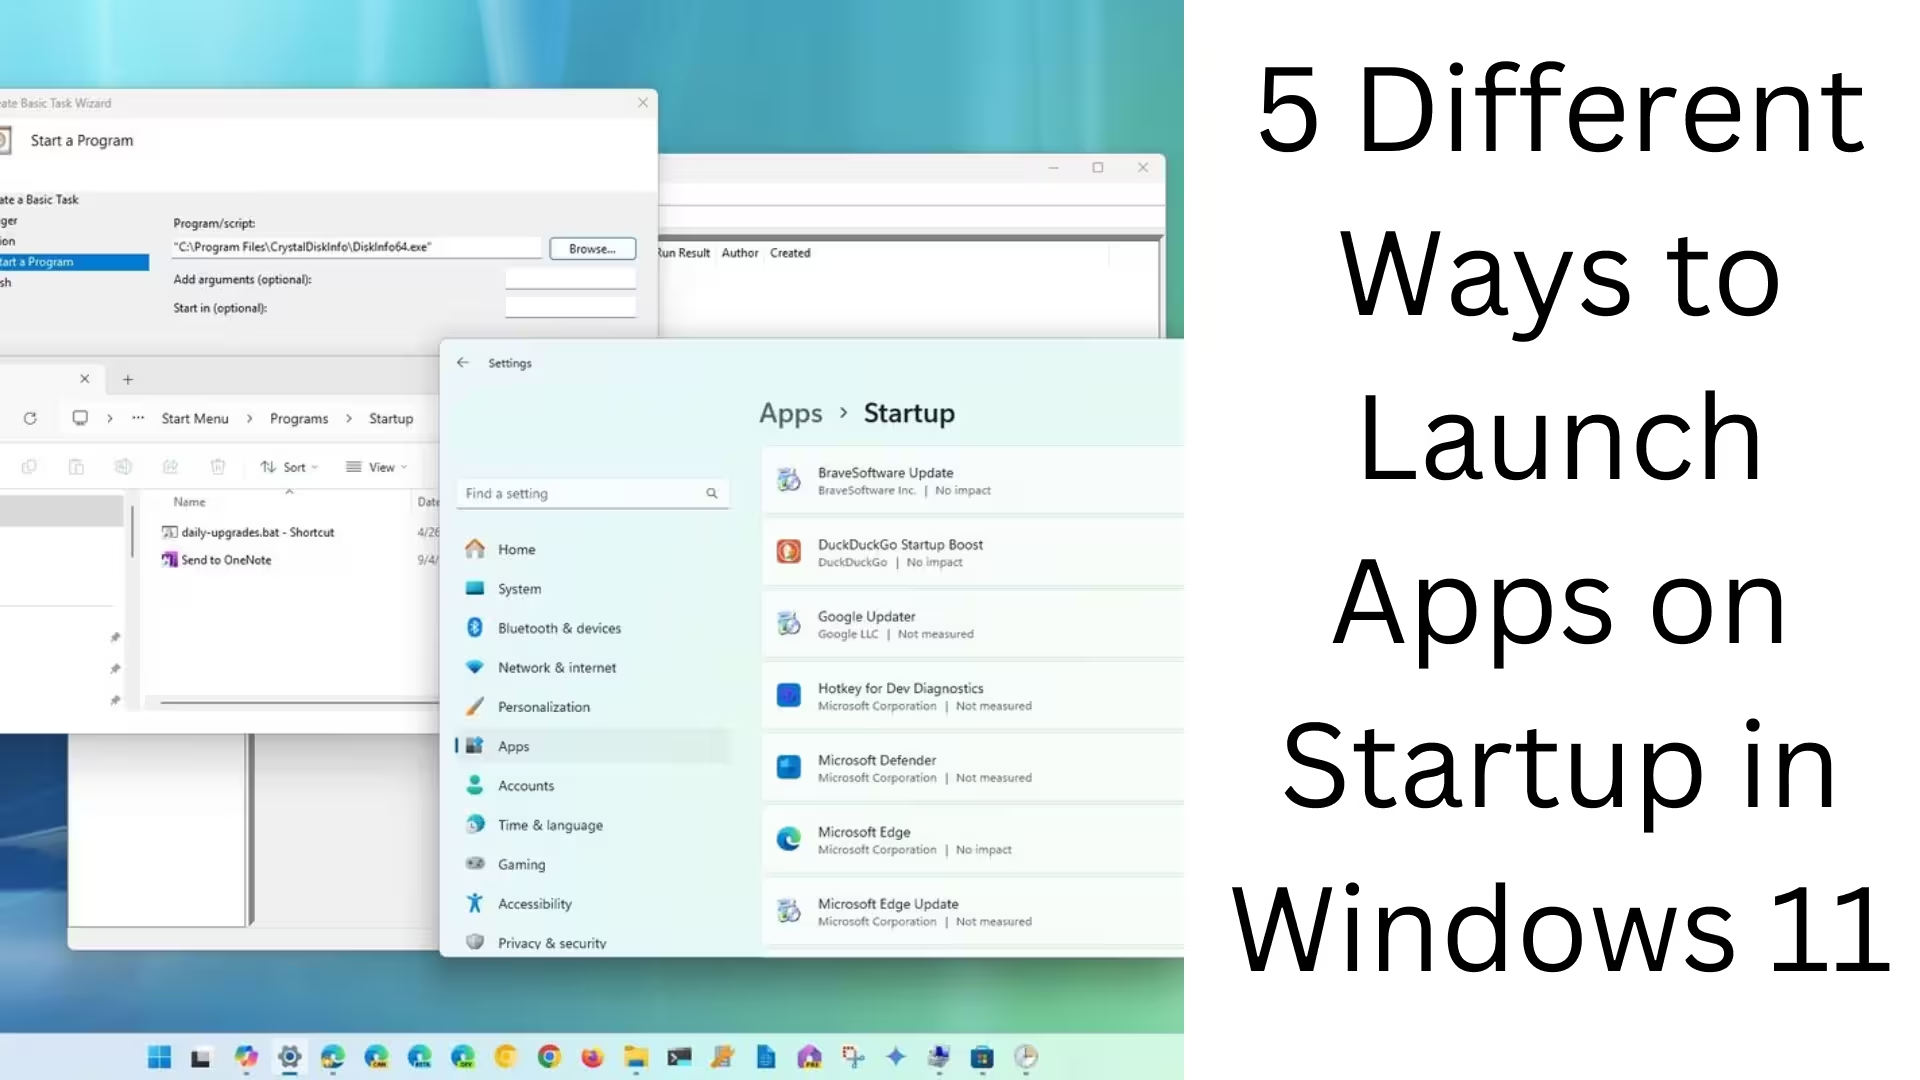
Method 1: Enabling Startup Apps from Windows 11 Settings
This is the simplest and safest method.
Step-by-Step Process
1. Open Settings by pressing Windows + I
2. Go to the Apps section
3. Click on Startup
4. Here you will see a list of all supported apps
5. Toggle ON the app you want to run at startup
Also read: How to Rename Your Windows 11 PC (5 Easy & Safe Methods)
Advantages
No third-party tools
Official method from Microsoft
Ideal for new users
Method 2: Managing Startup Programs from Task Manager
Task Manager is an advanced and powerful tool that allows you to control startup apps. Step-by-Step Process
1. Press Ctrl + Shift + Esc
2. Go to the Startup tab
3. See the list of all Startup Apps
4. Right-click on an app to enable it at startup
5. Click Enable
Additional Information
The app’s Startup Impact (Low, Medium, High) is also displayed here
Boot time can be reduced by disabling heavy apps
Method 3: Launching Apps using the Startup Folder
This method is useful for apps that don’t appear in Settings or Task Manager.
Step-by-Step Process
1. Press Windows + R
2. In the Run box, type:
“`
shell:startup
“`
3. The Startup folder will open
4. Copy the shortcut of the app you want to add to the startup
5. Paste it into the Startup folder
Useful for
Custom Apps
Portable Software
Scripts and Tools
Method 4: Adding Startup Apps via Registry Editor (For Advanced Users)
This method is for advanced users and IT professionals.
Step-by-Step Process
1. Windows + R → `regedit`
2. Navigate to this path:
“`
HKEY_CURRENT_USER\Software\Microsoft\Windows\CurrentVersion\Run
“`
3. Right-click → New > String Value
4. Give the app a name
5. In Value Data, enter the full path of the app
Important Warning
Make changes to the Registry carefully
Incorrect changes can damage the system
Method 5: Running Apps and Scripts at Startup using Task Scheduler
Task Scheduler is the most flexible and powerful method.
Step-by-Step Process
1. Search for Task Scheduler in the Start Menu
2. Click Create Basic Task
3. Enter the Task Name and Description
4. In Trigger, select When I log on
5. In Action, select Start a Program
6. Browse for the path of the app or script
7. Save the task
Key Advantages
Run apps with a delay
Launch with Admin Privileges
Supports scripts and batch files
How to Optimize Windows 11 Startup Apps? Keep only essential apps enabled
Disable high-impact apps
Review the startup list regularly
Remove unknown apps immediately
Common Questions about Startup Apps (FAQs)
Do too many startup apps slow down my PC?
Yes, too many apps affect both boot time and performance.
Can all apps be added to the startup?
Almost all apps can be added through the Startup Folder or Task Scheduler.
Is it safe to disable startup apps?
Absolutely, as long as you don’t disable system apps.
Conclusion
Launching apps at startup in Windows 11 is the smartest way to save time and speed up your workflow. Here, we have explained in detail 5 of the most effective, safe, and professional methods to help you fully customize and optimize your system.
If you want to make the most of Windows 11, managing startup apps wisely is crucial.
Are you searching for the best hosting plan? Click now and get 20% off
FAQs: Common Questions Related to Launching Apps at Startup in Windows 11
Q1. What are Startup Apps in Windows 11?
Startup Apps are applications that automatically run when Windows 11 starts, so the user doesn’t have to manually open the apps repeatedly.
Q2. Can all apps be added to Startup?
Yes, almost all apps can be added to Startup—either through Settings, Task Manager, the Startup Folder, Registry Editor, or Task Scheduler.
Q3. Does having too many Startup Apps slow down the PC?
Yes, having too many or high-impact Startup Apps can increase boot time and affect system performance.
Q4. Is it safe to disable Startup Apps in Windows 11?
It’s perfectly safe, just make sure not to disable system or security-related apps (like antivirus).
Q5. Where can Startup Apps be managed?
You can manage Startup Apps from Settings > Apps > Startup, Task Manager > Startup Tab, and the Startup Folder.
Q6. What is the Startup Folder and why is it used?
The Startup Folder is a special folder where app shortcuts placed inside it automatically run upon login. It’s very useful for custom and portable apps.
Q7. What is the advantage of adding Startup Apps using Task Scheduler?
With Task Scheduler, you can run apps with a delay, with admin rights, or under specific conditions, which provides advanced control.
Q8. Is adding Startup Apps using Registry Editor suitable for beginners?
No, the Registry Editor method is for advanced users. Incorrect modifications can cause system problems.
Q9. What is Startup Impact?
Startup Impact indicates how much load an app puts on the system during boot—Low, Medium, or High.
Q10. Which are the best Startup Apps to have in Windows 11?
Only keep apps in Startup that are related to daily use, work productivity, or security, such as an email client, cloud sync, or antivirus.