Today, Windows 11 is a modern and powerful operating system, but its performance depends entirely on your system’s RAM (Random Access Memory). If you need to understand your computer’s speed, multitasking capabilities, or upgrade needs, having complete information about your RAM is crucial.
In this detailed guide, we are sharing the 7 easiest, most accurate, and professional ways to check RAM information in Windows 11. Here you will find all the necessary information, such as Installed RAM, Available RAM, RAM Speed, RAM Type, Slot Details, and Usage.
1. Check RAM Information via the Settings App
This is the easiest and safest way to view basic RAM information in Windows 11.
Steps:
Click on the Start Menu
Open Settings
Go to System → About
See the Device specifications section
What you will find here:
Installed RAM
System’s 64-bit / 32-bit architecture
Device name and processor information
This method is ideal for users who want to know their RAM capacity without using any technical tools.
2. View RAM Usage and Details via Task Manager
If you want to know how much RAM is being used and how much is free, Task Manager is the best option.
Steps:
Press Ctrl + Shift + Esc on your keyboard
Click on the Performance tab
Select Memory from the left side
Here you will find Advanced information:
Total RAM
Used RAM
Available RAM
RAM Speed (MHz)
Slots Used
Form Factor (DDR4 / DDR5)
This method is especially useful for performance monitoring and troubleshooting.
3. Get Complete RAM Details with the System Information Tool
System Information is a built-in Windows tool that provides deep-level hardware information.
Steps:
Press Windows + R
Type msinfo32 and press Enter
Important RAM Details:
Total Physical Memory
Available Physical Memory
Virtual Memory
Complete system hardware overview
This method is better for users who need a detailed system report.
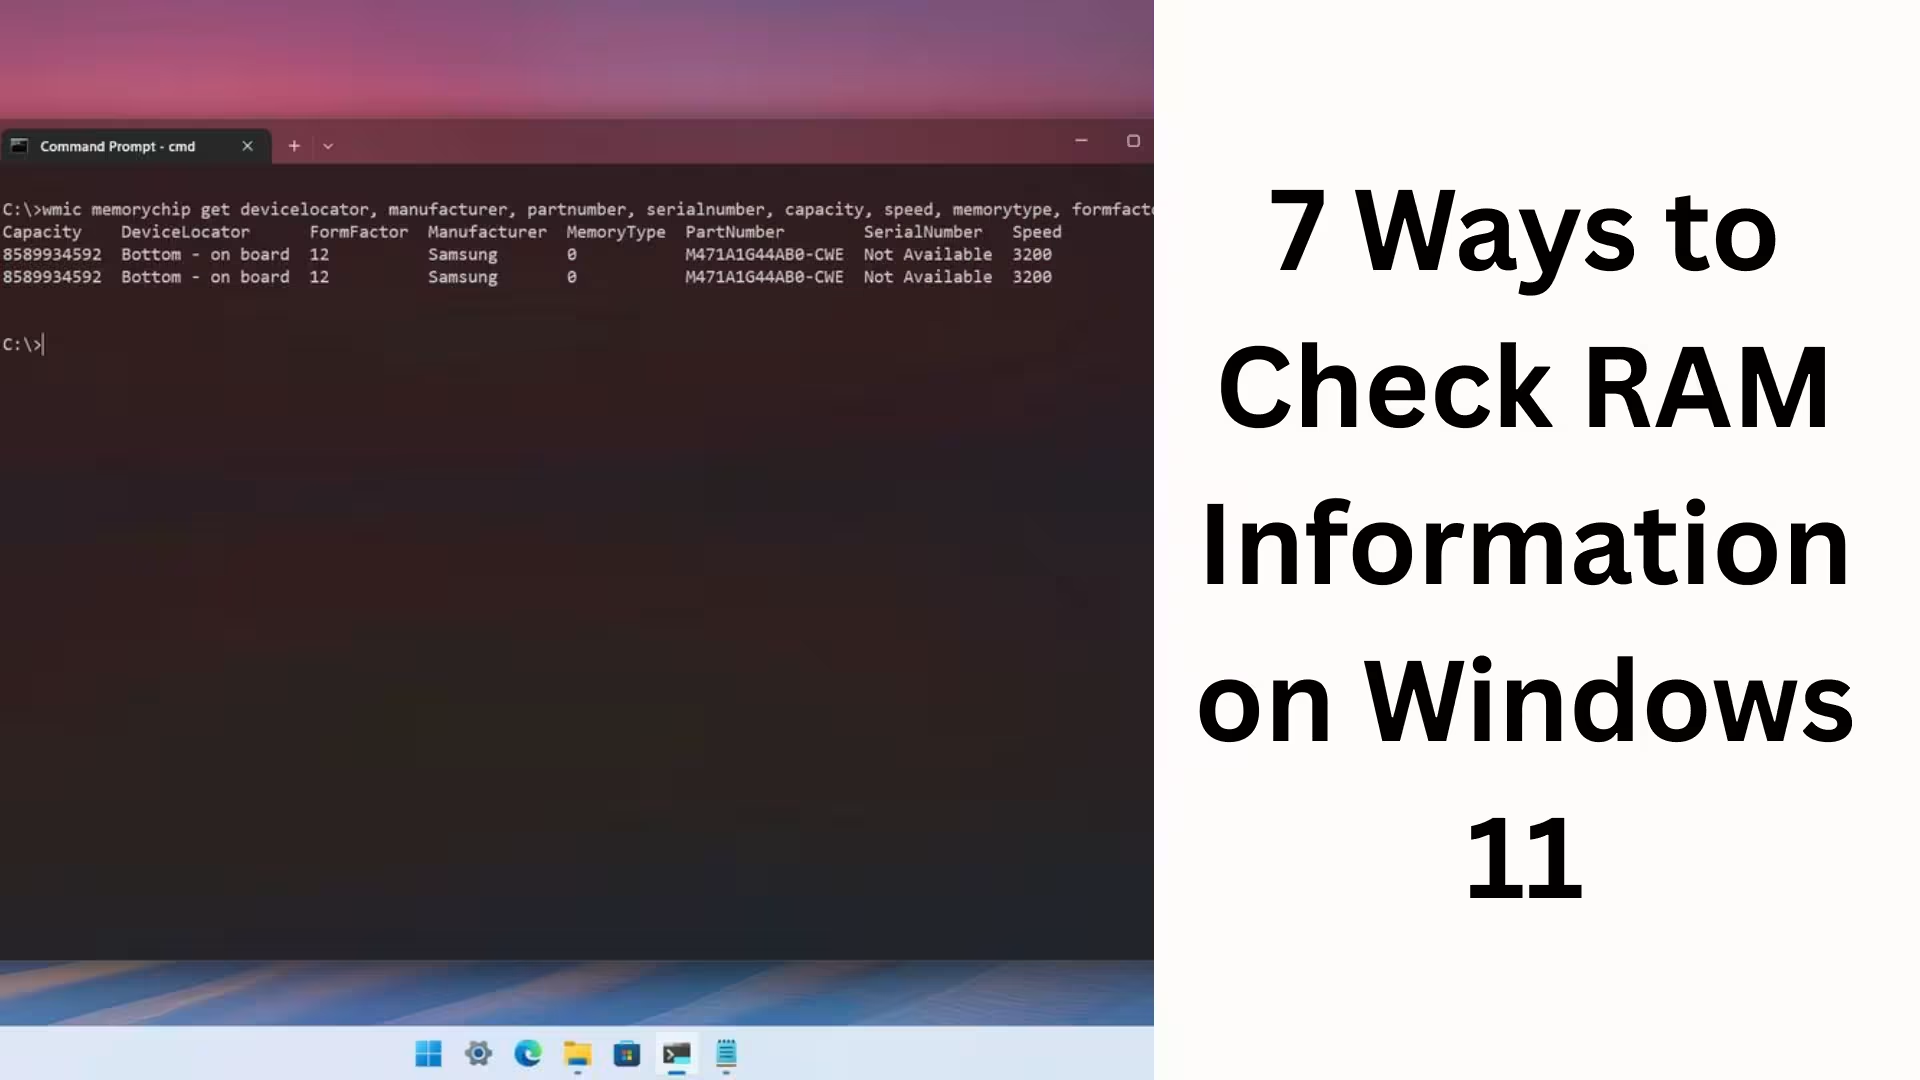
4. Get RAM Information from Command Prompt (CMD)
For users who are comfortable using technical commands, Command Prompt is a fast and accurate method.
Steps:
Search for CMD in the Start Menu
Select Run as Administrator
Type the following command:
“`
systeminfo | findstr /C:”Total Physical Memory”
“`
For additional information:
“`
wmic memorychip get capacity,speed,manufacturer
“`
This will give you information about RAM Capacity, Speed, and Manufacturer.
5. Check Advanced RAM Information with PowerShell
Windows PowerShell allows you to obtain professional and in-depth information related to RAM.
Steps:
Press Windows + X
Open Windows Terminal (Admin) or PowerShell (Admin)
Run this command:
“`
Get-CimInstance Win32_PhysicalMemory
“`
This will provide the following information:
RAM Slot-wise Capacity
Speed
Serial Number
Manufacturer Details
This method is extremely useful for IT professionals and advanced users.
6. View RAM using DirectX Diagnostic Tool (DxDiag)
For users involved in gaming and graphics, the DxDiag Tool is a reliable option.
Steps:
Press Windows + R
Type dxdiag
Open the System Tab
Here you will see:
Installed Memory (RAM)
Processor and DirectX Version
This method is particularly useful for checking compatibility with games and graphics applications.
7. Check the actual RAM information from BIOS/UEFI
If you want to verify the RAM at the hardware level, BIOS/UEFI is the most reliable method.
Steps:
Restart your computer
Press F2 / Del / Esc during boot
Open the Memory or System Information section
Here you will find:
Exact Installed RAM
RAM Frequency
Slot Configuration
This method is necessary when Windows is not detecting the RAM correctly. Essential RAM Tips for Windows 11
Use at least 8GB of RAM for better performance.
16GB or more RAM is ideal for heavy tasks and gaming.
Always check RAM speed and compatibility before upgrading.
Close unnecessary background apps to reduce RAM usage.
Conclusion
Checking RAM information in Windows 11 is not only easy but also crucial for system performance, upgrade planning, and troubleshooting. With the 7 methods described above, you can easily obtain basic to advanced RAM information according to your needs.
If you want to keep your system fast, stable, and future-proof, checking your RAM status periodically is a smart move.
Want to grow your website organically? Contact us now
FAQs – Frequently Asked Questions about RAM Information in Windows 11
Question 1: What is the easiest way to find out how much RAM is in Windows 11?
Answer: The easiest way to check RAM in Windows 11 is through Settings → System → About. Here you will find complete information about the installed RAM.
Question 2: Can the RAM speed also be viewed in Windows 11?
Answer: Yes, you can go to Task Manager → Performance → Memory to see information such as RAM Speed (MHz), Slots Used, and Form Factor.
Question 3: How to check how much RAM is free in Windows 11?
Answer: Task Manager is the best option for this. In the Performance tab, the Used and Available RAM are clearly displayed in the Memory section.
Question 4: How to get RAM information from the Command Prompt?
Answer: Open Command Prompt in Administrator mode and run this command:
`systeminfo | findstr /C:”Total Physical Memory”`
This will give you information about the total RAM of the system.
Question 5: How to view complete RAM details using PowerShell?
Answer: Open PowerShell (Admin) and run this command:
`Get-CimInstance Win32_PhysicalMemory`
This will give you information about the RAM’s Capacity, Speed, Manufacturer, and Slot Details.
Question 6: What are the symptoms of low RAM in Windows 11?
Answer: With low RAM, the system becomes slow, apps hang, multitasking becomes difficult, and sometimes the system may even freeze.
Question 7: How much RAM is necessary for Windows 11?
Answer:
8GB RAM for general use
16GB or more RAM is considered better for professional work, multitasking, and gaming.
Question 8: Is it necessary to check RAM in the BIOS?
Answer: It’s not necessary, but if Windows is not showing the correct RAM or if there are problems after an upgrade, checking the RAM in the BIOS/UEFI is the most reliable method.
Question 9: Does upgrading RAM increase the speed of Windows 11?
Answer: Yes, upgrading to RAM with the correct capacity and speed significantly improves system performance, app loading speed, and multitasking capabilities.
Question 10: Is third-party software necessary to view RAM information in Windows 11?
Answer: No, the built-in tools in Windows 11, such as Settings, Task Manager, CMD, PowerShell, and System Information, are sufficient to provide complete RAM information.