Memory Integrity is an important security feature in Windows 11 that protects your system from kernel-level malware, driver attacks, and unauthorized access. If your PC displays “Memory Integrity is Off” and you can’t enable it, this article is the perfect solution to your problem. Here, we’ll explain in a simple, detailed, and SEO-optimized way why Memory Integrity is Off in Windows 11 and how to enable it step-by-step.
What is Memory Integrity?
Memory Integrity, considered part of Core Isolation, is a security feature that protects your system’s memory using Virtualization-based Security (VBS) in Windows 11.
This feature ensures that:
No malicious drivers can modify your kernel memory
Your system is protected from rootkits and advanced cyber attacks
Windows 11’s overall system stability is improved
If Memory Integrity is Off, your system may be vulnerable, and Windows recommends enabling it immediately.
Why Does Memory Integrity Show Up? (Reasons Why Memory Integrity Is Off)
There are several possible reasons why Memory Integrity is automatically turned off in Windows 11:
1. Incompatible or Outdated Drivers Installed
Some outdated hardware driers are incompatible with Memory Integrity. The system blocks them and turns off the feature.
2. Third-Party Security Tools Conflicts
Some antivirus or system optimization tools conflict with Windows Security.
3. Corrupted System Files
Memory Integrity cannot be activated if Windows system files are corrupted.
4. Virtualization Settings are Disabled
Memory Integrity is Off when VBS and Hypervisor-based Protection are disabled.
5. Hardware Support Not Available
Sometimes, required virtualization options are disabled in the BIOS.
How to Enable Memory Integrity in Windows 11 (Step-by-Step Guide)
Carefully follow all the steps below. This will enable Memory Integrity without any errors.
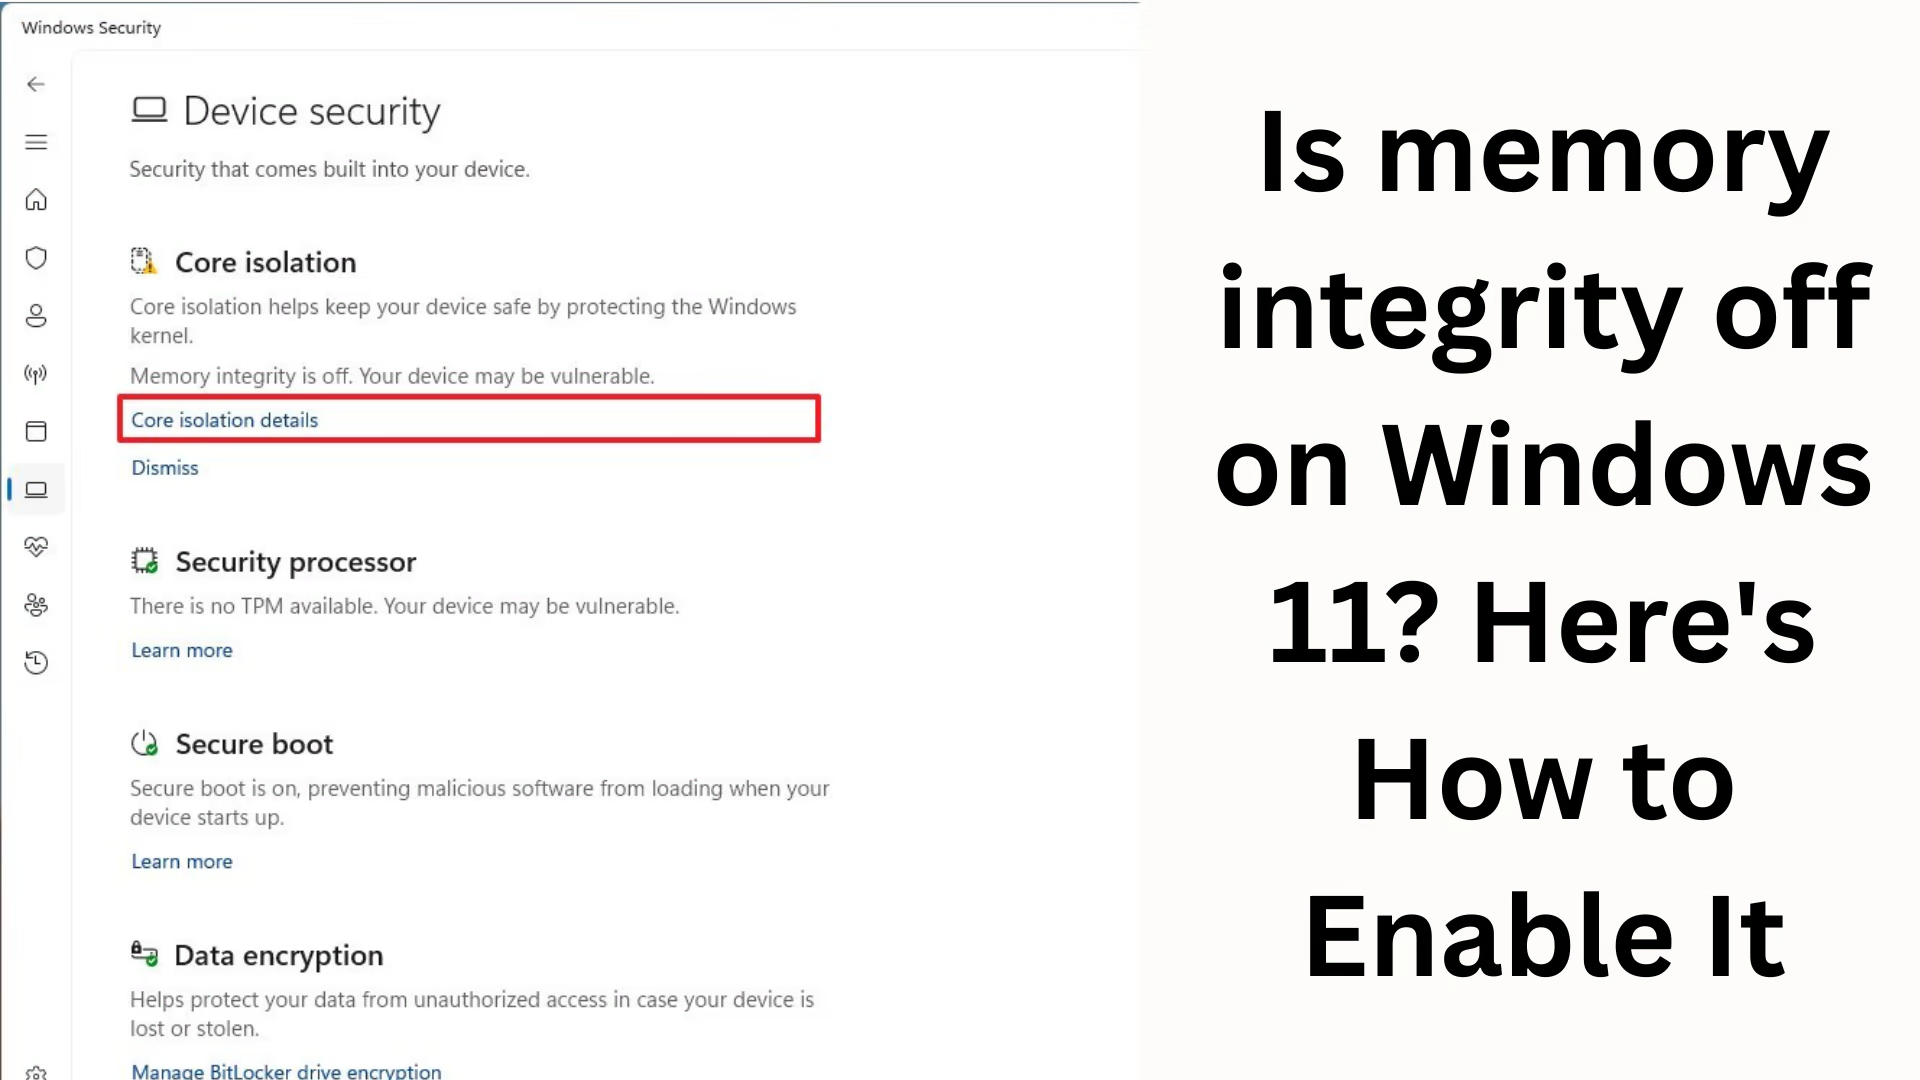
Step 1: Enable Memory Integrity from Windows Security
1. Open the Start Menu
2. Search for Windows Security
3. Open → Device Security
4. Click → Core isolation details
5. You will see Memory Integrity here.
6. If it is off, turn it on.
If turning it on results in an error or “Incompatible drivers detected,” follow the next steps below.
Step 2: Remove or Update Incompatible Drivers
Memory Integrity is most often caused by incompatible drivers.
Check which drivers are incompatible
When you try to turn on Memory Integrity, Windows will automatically tell you which drivers are incompaible.
Example:
oem12.inf
wdcsys.sys
older Intel/AMD drivers
Logitech/Realtek/Bluetooth drivers
Remove Incompatible Drivers
1. Press Win + X
2. Select → Device Manager
3. Find the specific device in the listed hardware
4. Right-click on it
5. Select → Uninstall device
6. Restart the PC
Update the Driver
Go to your hardware manufacturer’s official website
Download the latest driver version
Install and restart the PC
Now try turning on Memory Integrity again.
Step 3: Repair System Files (SFC + DISM Commands)
If corrupted files are causing the problem, the commands below will fix the problem.
Run CMD as Administrator and run these commands:
“`
sfc /scannow
“`
After completion, run this command:
“`
DISM /Online /Cleanup-Image /RestoreHealth
“`
Restart the PC and try enabling Memory Integrity.
Step 4: Enable Virtualization in the BIOS
Memory Integrity only works if Virtualization is enabled in the BIOS.
How to enable VT-x/SVM in BIOS:
1. Restart your PC.
2. Press to enter BIOS/UEFI.
F2 / Delete / F10 / ESC (varies by motherboard).
3. Go to the Advanced or Security tab.
4. Enable:
Intel VT-x
AMD SVM
Virtualization Technology
5. Save settings and restart.
Memory Integrity will now be easily enabled.
Step 5: Run a Clean Boot and Enable Memory Integrity.
Sometimes third-party services block Memory Integrity.
Clean Boot Steps:
1. Open Run → `msconfig`
2. Select → Selective Startup
3. Uncheck → Load Startup Items
4. Go to → Services tab
5. Tick → Hide all Microsoft services
6. Click → Disable All
7. Restart the PC
Now try turning on Memory Integrity.
Step 6: Be sure to update Windows
Older Windows builds have several security conflicts.
Check for updates:
1. Settings → Windows Update
2. Click → Check for updates
3. Install all updates
4. Restart the PC
Memory Integrity should now be enabled.
Memory Integrity Won’t Enable? (Final Expert Solutions)
If Memory Integrity still won’t turn on, try these advanced methods:
1. Manually Delete Old INF Files
Sometimes old INF drivers are hidden:
“`
C:\Windows\INF
“`
Find and delete problematic drivers here.
2. Use an offline driver cleanup tool
such as:
Snappy Driver Installer
DriverStore Explorer
These make it easy to uninstall old drivers.
3. Perform a Fresh OS Repair Install
Windows can be repaired without reinstalling.
Is it necessary to keep Memory Integrity on? (Should You Keep Memory Integrity On?)
Yes, if you value system security, keeping Memory Integrity on is crucial.
This protects your PC from:
Kernel malware
Driver attacks
Zero-day exploits
Ransomware
Unauthorized code execution
Conclusion
Memory Integrity is a robust security feature in Windows 11, and if it’s showing as Off, you can easily enable it by following the steps above. Incompatible drivers and virtualization settings are the most common problems. After trying all the methods, your system will be secure and stable.
Want to grow your website organically? Contact us now
FAQ – Common questions about Memory Integrity in Windows 11
1. What is Memory Integrity?
Memory Integrity is part of Windows 11’s Core Isolation protection. It protects your system’s memory so that malicious drivers or malware can’t damage kernel memory.
2. Why does Memory Integrity Off appear in Windows 11?
Some of the main reasons for Memory Integrity Off are:
Outdated or incompatible drivers
Third-party antivirus tools
Corrupt system files
Virtualization is disabled in the BIOS
Unsupported hardware settings
3. Why does an error occur when enabling Memory Integrity occur?
This error occurs when Windows detects drivers that are incompatible with this feature. Windows blocks these drivers to keep the system safe.
4. How to remove incompatible drivers?
1. Open Device Manager
2. Find the driver shown in the error
3. Right-click → Uninstall device
4. Restart the PC
5. Is it necessary to have Memory Integrity turned on?
Yes, this feature significantly enhances system security. It protects your system from kernel-level attacks and malware.
6. Can turning on Memory Integrity slow down your PC?
There may be a slight impact, but on modern PCs, it’s negligible. This option should be kept on for security.
7. How to enable Virtualization in BIOS?
1. Restart the PC
2. Press F2, Delete, or ESC to enter the BIOS.
3. Find Virtualization settings → Intel VT-x / AMD SVM
4. Enable
5. Save and restart
8. Memory Integrity is still showing a warning even after turning it on, what should I do?
Update Windows
Update all drivers
Run the SFC and DISM commands
Manually delete incompatible drivers
9. Can Memory Integrity be enabled without removing drivers?
In most cases, no. You’ll need to remove or update incompatible drivers.
10. Does Windows 10 also have Memory Integrity?
Yes, Windows 10 also has this feature within Core Isolation.
11. Is it safe to turn on Memory Integrity?
Absolutely! It’s a Microsoft-approved security layer that protects your PC from advanced cyber attacks.