If you wish to obtain information regarding your computer’s graphics capabilities, sound system, and DirectX version, the DirectX Diagnostic Tool (DxDiag) is an extremely useful utility. In this article, we will explain in detail how to open the DirectX Diagnostic Tool in Windows 11, while also covering all of its key features and uses.
What is the DirectX Diagnostic Tool?
The DirectX Diagnostic Tool, commonly referred to as DxDiag, is a built-in utility available within Windows systems. This tool provides you with detailed information regarding your system’s hardware and drivers, such as:
- DirectX Version
- Graphics Card Details
- Sound Device Information
- Driver Status and Issues
This tool is primarily used to identify and diagnose issues related to gaming and graphics.
Ways to Open the DirectX Diagnostic Tool in Windows 11
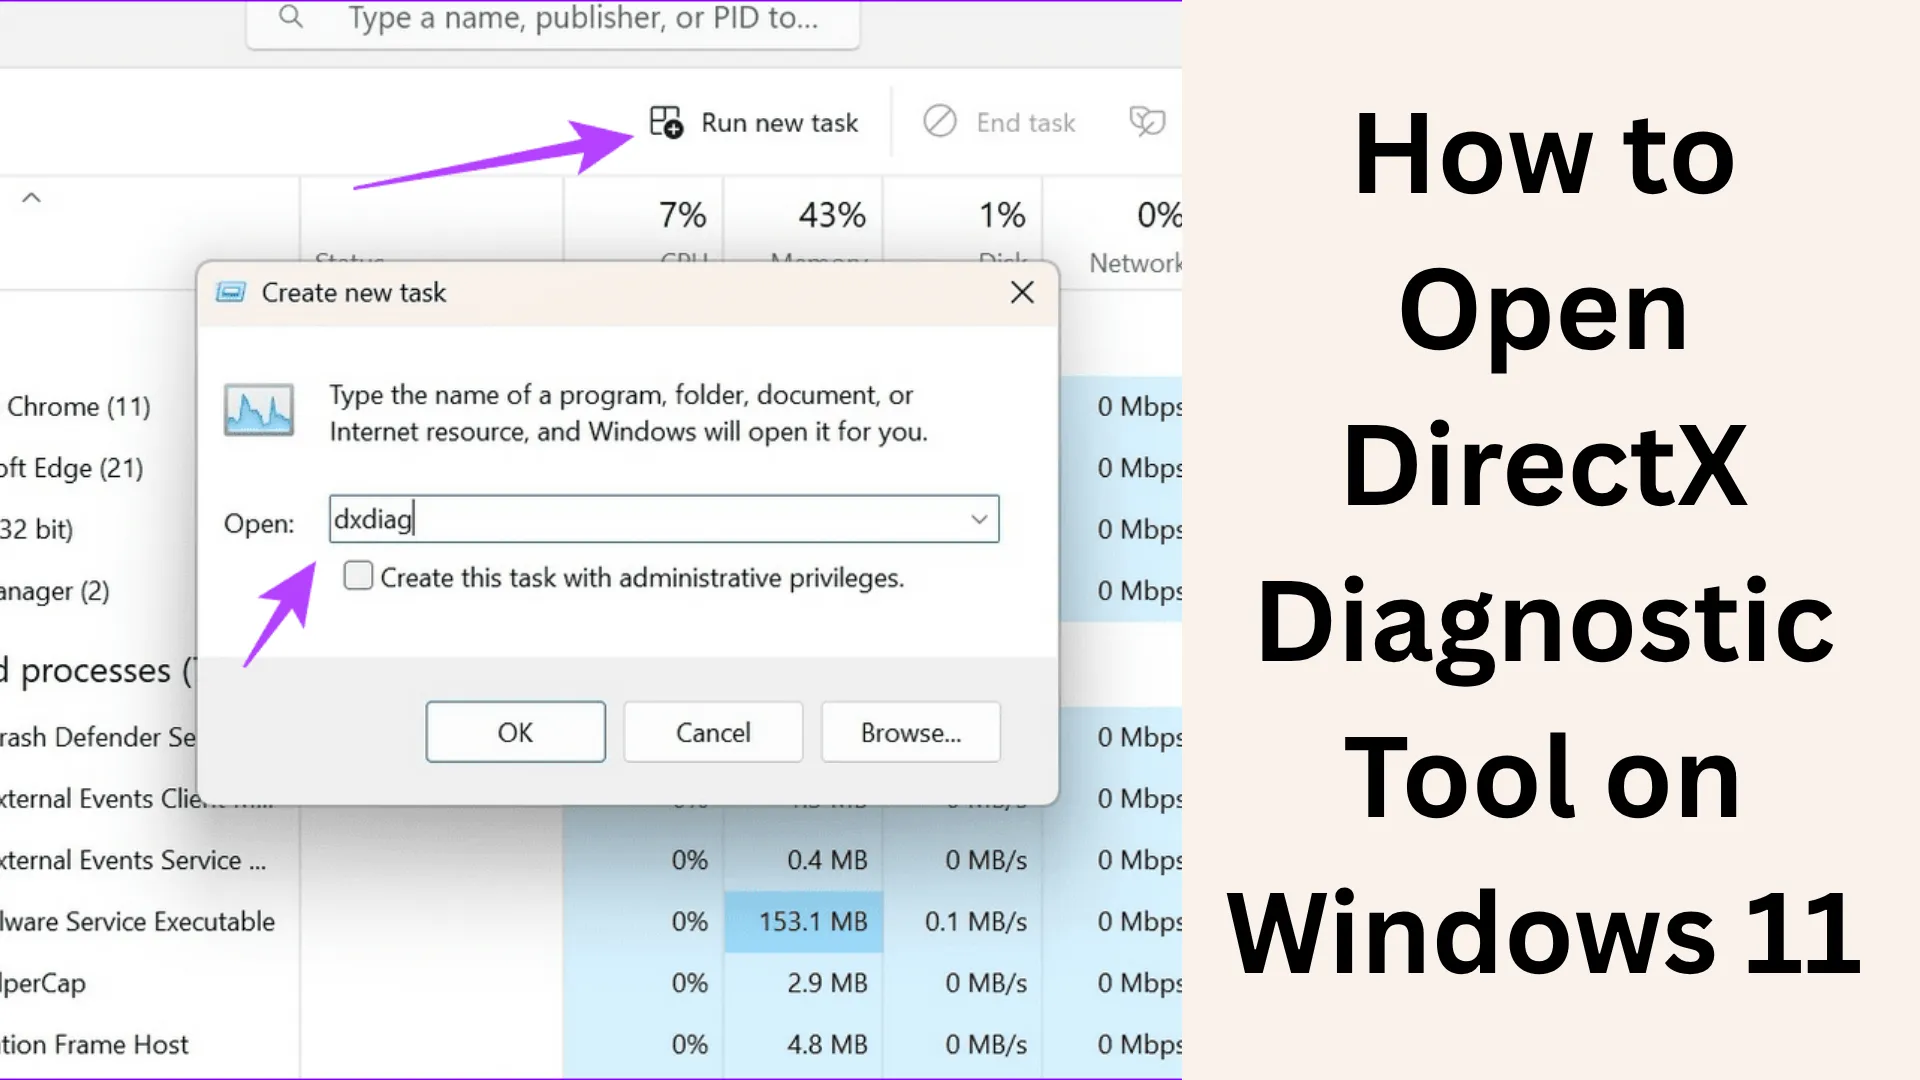
1. Open DxDiag via the Run Command
This is the easiest and fastest method:
1. Press the Windows + R keys.
2. In the Run box, type:
dxdiag
3. Press Enter.
The DirectX Diagnostic Tool will open within a few seconds.
2. Open the DirectX Diagnostic Tool from the Start Menu
1. Click on the Start Menu.
2. In the search bar, type: dxdiag
3. Click on the result that appears.
This method is convenient for users who prefer using a GUI interface.
3. Open DxDiag via the Command Prompt
1. Open the Command Prompt (CMD).
2. Type the command:
dxdiag
3. Press Enter.
This method is useful for advanced users.
4. Open the DirectX Tool via Windows PowerShell
1. Open PowerShell.
2. Type:
dxdiag
3. Press Enter.
This is also a quick and effective method. 5. Open DxDiag by Creating a Desktop Shortcut
If you use DxDiag frequently:
1. Right-click on the desktop.
2. Select New > Shortcut.
3. In the location field, type:
dxdiag
4. Click Next and Finish.
You can now open the tool directly from the shortcut.
Also read: Easy and Effective Way to Completely Uninstall Microsoft 365 or Office 2024 Apps in Windows 11
Main Sections of the DirectX Diagnostic Tool
When you open DxDiag, you will see several tabs:
1. System Tab
Here, you will find information related to your system:
- Windows Version
- Processor Details
- RAM
- DirectX Version
2. Display Tab
This tab contains information regarding your graphics card:
- GPU Name
- VRAM (Video Memory)
- Driver Version
- Display Resolution
3. Sound Tab
This section displays information about your audio devices:
- Sound Card Name
- Driver Details
- Audio Issues
4. Input Tab
Here, you will find information about your input devices:
- Keyboard
- Mouse
- Connected Controllers
Why Use the DirectX Diagnostic Tool?
DxDiag is useful for several important reasons:
To Check Gaming Performance
You can determine whether your system is capable of handling gaming.
To Detect Driver Issues
If a driver is faulty or outdated, this tool provides immediate notification.
To Share System Information
You can save the DxDiag report and send it to technical support.
How to Save a DxDiag Report?
1. Open DxDiag.
2. Click the “Save All Information” button located at the bottom.
3. Save the file to a desired location.
This report is saved in .txt format.
Also read: How to Run Gemma 7 Locally on an Android Phone?
How to Check DirectX Version?
1. Open DxDiag
2. Go to the System tab
3. Look below: DirectX Version
This information helps you understand your system’s graphics capabilities.
What to do if DxDiag doesn’t work?
If the DirectX Diagnostic Tool won’t open:
Update the system
Install the latest updates by running Windows Update.
Update DirectX
Install the latest DirectX from the Microsoft website.
Run an SFC Scan
Type sfc /scannow into the Command Prompt
Benefits of the DirectX Diagnostic Tool
Free and built-in tool
Real-time system information
Helps with gaming and graphics troubleshooting
User-friendly interface
Conclusion
The DirectX Diagnostic Tool in Windows 11 is extremely easy to open and is the most reliable tool for checking your system’s graphics, audio, and driver status. Whether you’re a gamer or a regular user, using DxDiag can help you better understand your computer’s performance and quickly resolve issues.
FAQs – Important Questions Related to the DirectX Diagnostic Tool (DxDiag)
Q1. What does the DirectX Diagnostic Tool (DxDiag) do?
The DirectX Diagnostic Tool provides comprehensive information regarding your system’s graphics, audio, and DirectX components. This tool is particularly useful for diagnosing gaming and multimedia-related issues.
Q2. What is the easiest way to open DxDiag in Windows 11?
The easiest method is:
Press Windows + R → Type `dxdiag` → Press Enter
This opens the tool instantly.
Q3. Does DxDiag work without an internet connection?
Yes, DxDiag is a completely offline tool and does not require an internet connection to run.
Q4. Does DxDiag provide information about the graphics card?
Yes, in DxDiag, you can view all essential details such as your GPU name, VRAM, driver version, and status.
Q5. How do I save a DxDiag report?
After opening DxDiag, click on the “Save All Information” button located at the bottom of the window to save the file. This report is saved in .txt format.
Q6. Is DxDiag safe?
Yes, it is an official and secure tool from Microsoft that comes pre-installed with Windows.
Q7. How do I check the DirectX version using DxDiag?
Open DxDiag → Go to the System Tab → The DirectX Version will be displayed at the bottom.
Q8. What should I do if DxDiag is not working?
You should follow these steps:
Run Windows Update
Update DirectX
Run `sfc /scannow` in the Command Prompt
Q9. Can DxDiag improve gaming performance?
No, this tool only helps identify issues; it does not directly improve performance.
Q10. Is DxDiag available on all Windows versions?
Yes, it is available on Windows 7, 8, 10, and Windows 11.
Q11. Can DxDiag be used on mobile devices?
No, this tool is designed exclusively for Windows PCs and laptops.
Q12. Is it safe to share a DxDiag report?
Yes, but since it contains technical system information, you should share it only with trusted individuals or technical support personnel.
Are you searching for the best hosting plan? Click now and get 20% off


