Windows 11 is a modern and secure operating system, in which users get many features to manage accounts. Often, we need to temporarily disable a user account so that we cannot log in to it, but the data remains secure. In this article, we will discuss 5 effective ways to disable a user account in Windows 11, which are easy, safe, and useful to disable the account permanently or temporarily.
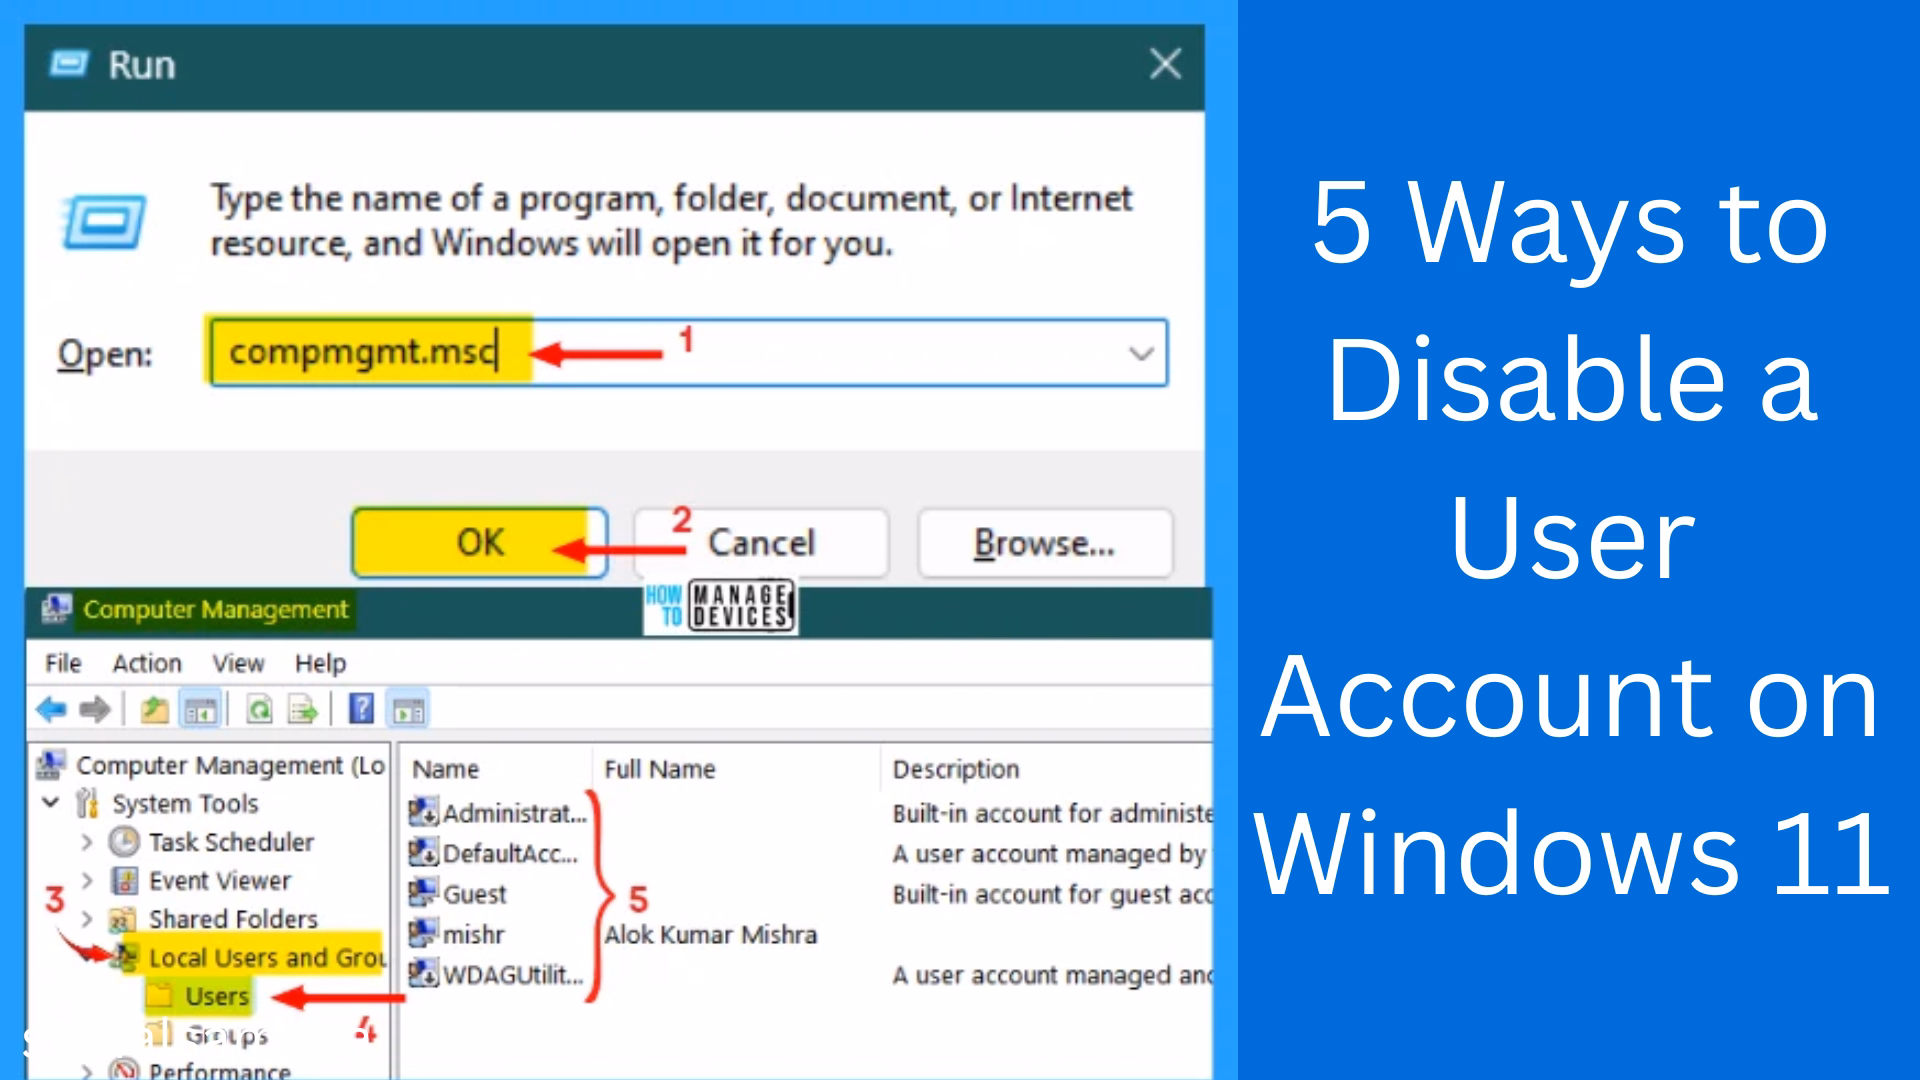
1. Disable the User Account from Computer Management
Computer Management tool is a great interface of Windows from which we can easily control local users.
Steps:
1. Press `Windows + X` and select Computer Management.
2. Click on Local Users and Groups > Users from the left side.
3. Right-click on the user account on the right side that you want to disable.
4. Click on Properties.
5. Check the Account is disabled checkbox.
6. Close the window by pressing OK.
Now that the user account is completely disabled, and cannot be logged in.
2. Disable the account from the Command Prompt (CMD)
For users who prefer the command line interface (CLI), this method is fast and effective.
Steps:
1. Type “cmd” in the Start Menu, and click Run as administrator.
2. Type the command given below:
“`
net user username /active: no
“`
Example:
“`
net user Ram /active: no
“`
3. Press Enter.
This command will temporarily disable the user account. When you want to activate it again, use `/active: yes`.
3. Disable User Account from Local Group Policy Editor
This method works in Windows 11 Pro and Enterprise versions. With Group Policy, we can limit or disable user access.
Steps:
1. Press `Windows + R` and type gpedit.msc.
2. Go to the following path:
“`
Computer Configuration > Windows Settings > Security Settings > Local Policies > User Rights Assignment
“`
3. Double click on Deny log on locally.
4. Click on Add User or Group and add the name of that user.
5. Save by pressing OK.
This will prevent that user from logging in to the system locally.
4. Disable User Account from PowerShell
PowerShell is a powerful tool that allows you to give scripting and advanced control to the system.
Steps:
1. Type PowerShell in the Start Menu and select Run as administrator.
2. Type this command:
“`powershell
Disable-LocalUser -Name “username”
“`
Example:
“`powershell
Disable-LocalUser -Name “Sita”
“`
3. Press Enter.
This will disable the local user you selected.
5. Remove the account from the Settings app (for temporary users only)
If you have set up a new Local User Account and you want to disable it temporarily, you can remove it from the Settings app.
Steps:
1. Press `Windows + I` and open Settings.
2. Go to Accounts > Family & other users.
3. Click Remove under the user you want to remove.
4. Confirm that you want to remove it.
Note: This may delete the account permanently. If you only want to disable, use the other options above.
Things to note before disabling an account
Before disabling an account, make sure it is not connected to any essential service.
If the account contains important files, make sure to take a backup.
Before disabling the Administrator account, arrange for another admin user.
Conclusion
Disabling a user account in Windows 11 is a responsible task. With the help of the above methods, you can disable any user account temporarily or permanently, without losing its data. These measures are especially useful when you want to increase security or temporarily block access to a user.
Want to grow your website organically? Contact us now
Frequently Asked Questions (FAQs) About Disabling User Accounts in Windows 11
Q1: Does disabling a user account delete data?
Answer: No, when you disable a user account, its data is not deleted. The user cannot log in, but his files and settings remain in the system.
Q2: What types of accounts can I disable?
Answer: You can disable Local User Accounts and Standard Accounts. There must be at least one other Admin account before disabling the Administrator account.
Q3: Can I re-enable the account later?
Answer: Yes, you can re-enable the account. Just use the same command or settings and choose the Enable option instead of the Disable, like:
“`
net user username /active: yes
“`
Q4: Is it safe to disable from the Settings app?
Answer: Removing an account from the Settings app may delete the account permanently. If you just want to disable, use methods such as Computer Management or the Command Prompt.
Q5: What is the difference between PowerShell and Command Prompt?
Answer: Both tools are command-line interfaces, but PowerShell is more advanced and scripting-friendly. Command Prompt is useful for simple tasks, while PowerShell gives you advanced control.
Q.6: Can a Microsoft Account also be disabled using these methods?
Answer: No, most of the methods mentioned above work only for Local Accounts. To disable the Microsoft Account, other measures like signing out of the account or managing the account from Microsoft’s website will have to be taken.
Q.7: Is Group Policy Editor available in all Windows 11 versions?
Answer: No, Group Policy Editor (gpedit.msc) is available only in Windows 11 Pro, Enterprise, and Education versions. It is not available in the Home version.
Q.8: Can multiple user accounts be disabled at once?
Answer: Yes, you can disable multiple accounts at once using scripts via PowerShell or Command Prompt.