If you do gaming or graphics-related work in Windows 11, then you have probably heard of DirectX Shader Cache. This cache helps to improve the graphical performance of the system, but sometimes it can become corrupt or cause problems. In such a situation, it becomes necessary to delete it. In this article, we will explain in detail how you can delete DirectX Shader Cache in Windows 11, that too in very easy and effective ways.
What is DirectX Shader Cache?
DirectX Shader Cache is a special type of cache file that Windows saves on your computer to speed up the processing of graphic data. These files do not allow the GPU to repeat the processing of shaders used, allowing games and other graphic-heavy programs to run smoothly.
But when this cache becomes corrupt or too large, it can have a negative impact on the system. Therefore, it becomes necessary to delete it from time to time.
Main reasons to delete DirectX Shader Cache
Free up extra space
Fix graphics-related errors
Fix gaming lag or freeze problems
Ensure better performance after a new GPU or driver update
Ways to remove DirectX Shader Cache in Windows 11
1. Delete Shader Cache using Windows Settings
Step 1: Open the Start Menu and click on “Settings”.
Step 2: Go to System > Storage > Temporary files.
Step 3: It will take some time for the “Temporary files” to load.
Step 4: Here, you will see the option of DirectX Shader Cache.
Step 5: Select it and click on the “Remove files” button given below.
> This is the easiest and safest way to remove Shader Cache.
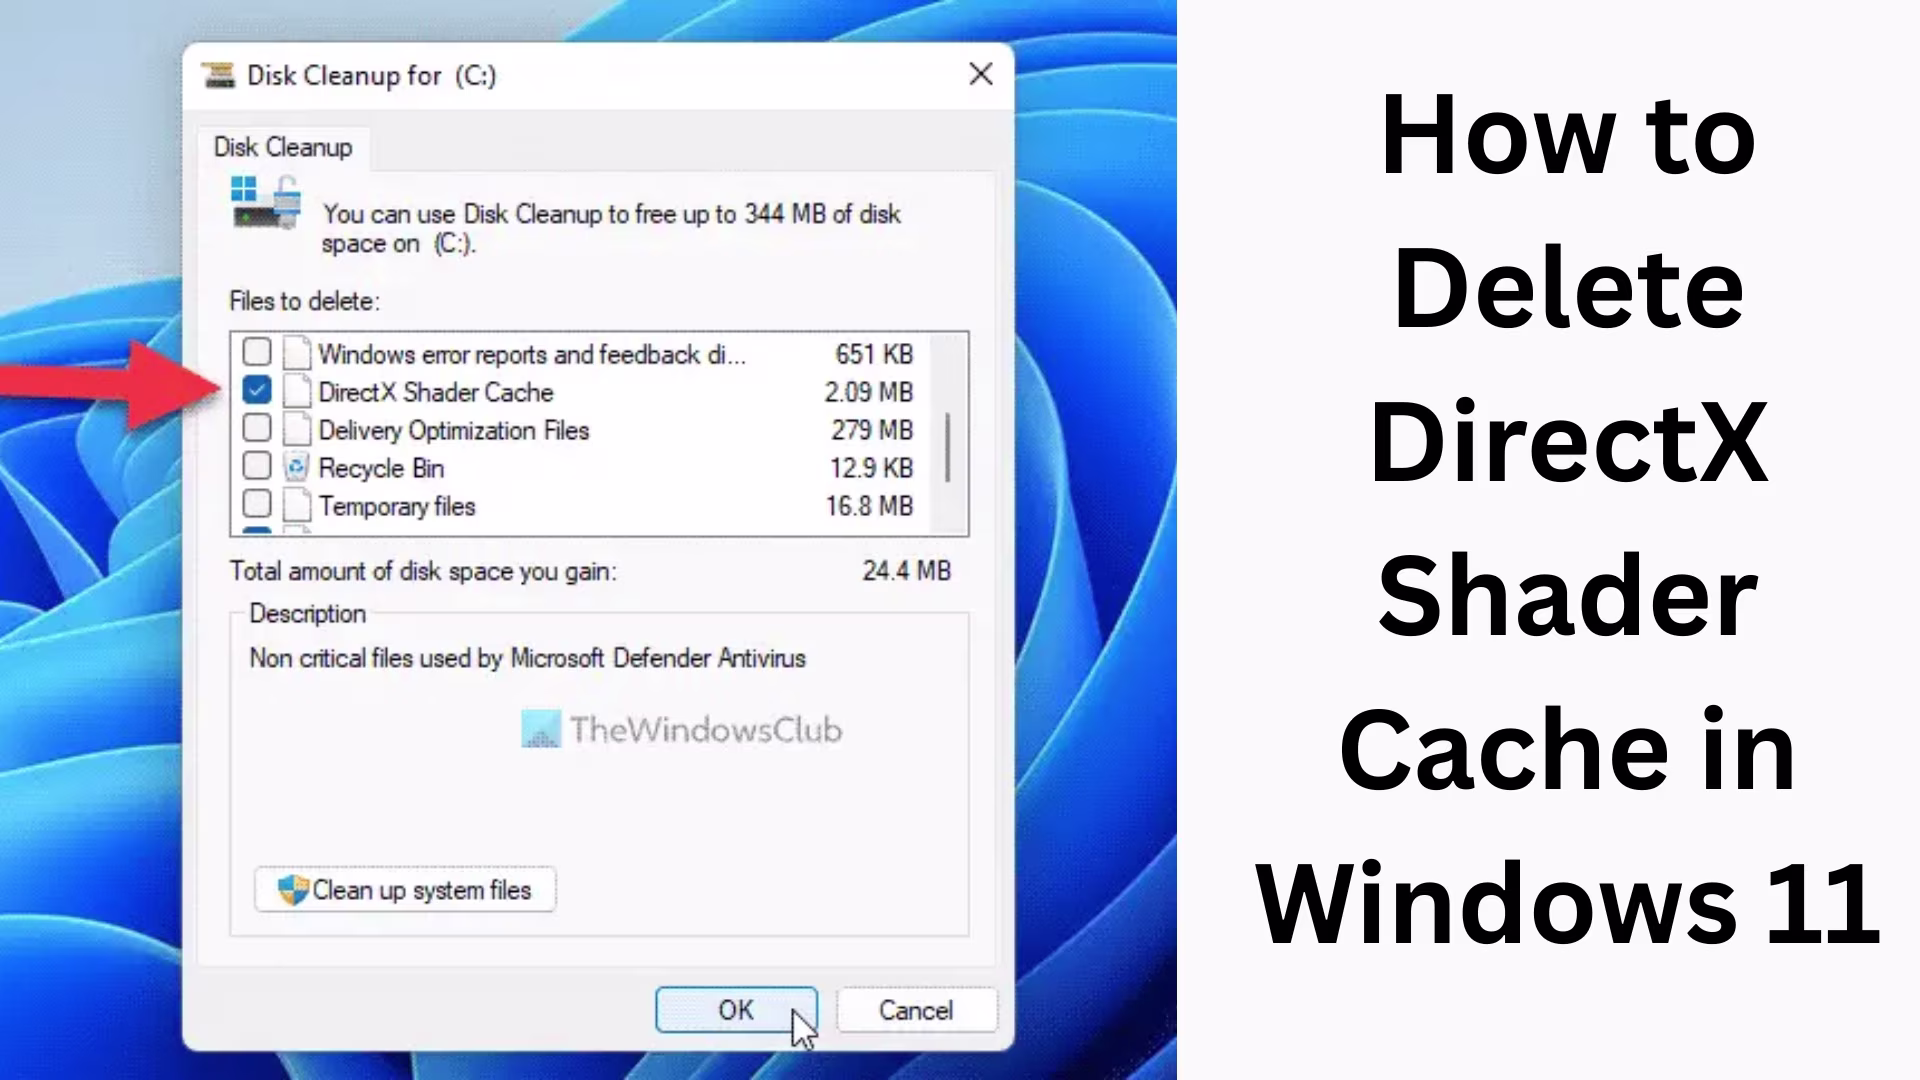
2. Use the Disk Cleanup Tool
Step 1: Search for and open “Disk Cleanup” in the Start Menu.
Step 2: Select the drive where Windows is installed (often the C: drive).
Step 3: Select DirectX Shader Cache from the list.
Step 4: Click on OK and then on “Delete Files”.
> Disk Cleanup is an old but trusted method.
3. Delete Shader Cache from Command Prompt
Step 1: Search for “CMD” in the Start Menu, right-click on it, and select Run as Administrator.
Step 2: Copy-paste the below command:
“`bash
del /s /q /f %LocalAppData%\D3DSCache
“`
Step 3: Press Enter.
> This method is for technical users who are comfortable with the command line.
4. Delete the Shader Cache folder manually
Step 1: Press Windows + R and type in the Run box:
“`bash
%LocalAppData%\D3DSCache
“`
Step 2: Press Enter.
Step 3: Select and delete all the files in the opened directory.
Step 4: Empty the Recycle Bin as well.
> This method is also fast and effective, but do it carefully.
5. Use third-party PC cleaner tools (optional)
If you want to avoid deleting files manually, you can use some trusted cleaners like:
CCleaner
BleachBit
Glary Utilities
There are many cache options in which the DirectX Shader Cache can also be removed.
What to do after deleting Shader Cache?
Restart the PC so that the changes take effect.
If you are gaming, the Shader Cache will be regenerated, and performance will improve.
Updating GPU drivers is also recommended.
Benefits of Removing DirectX Shader Cache
| Benefits | Description |
|———|————|
| Saving disk space | Sometimes this cache occupies GBs of space |
| Improvement in system performance | Especially in gaming and graphics |
| Possible bugs and lag fixes | Old/corrupt cache causes problems |
| Fresh performance due to new cache generation | Which gives smoother gameplay and rendering |
Precautions to keep in mind
There is no need to delete the Shader Cache repeatedly.
Delete it only if the performance of games in your system is deteriorating.
Read reviews of any third-party cleaner before using it.
Conclusion
Deleting DirectX Shader Cache is not only simple in Windows 11, but many times it can take system and gaming performance to new heights. Whether you do it manually or from Windows Settings, following all the above methods can give your system a refresh and speed.
Want to grow your business organically? Contact us now
Frequently Asked Questions (FAQs)
Is it safe to delete DirectX Shader Cache?
Yes, it is completely safe to delete DirectX Shader Cache. These are only temporary files that are created to improve graphics performance. Deleting them does not harm the system.
What happens when you delete DirectX Shader Cache?
Deleting Shader Cache removes old or corrupt shader files. After this, when you run a game or graphics-related app, Windows creates new cache files, which can improve performance.
How often should I delete the Shader Cache?
If your system is facing graphics or gaming-related problems or you have updated the GPU driver, then it is beneficial to remove the Shader Cache only. Generally, there is no need to remove it frequently.
Does deleting the Shader Cache increase the performance of games?
If the old cache files are corrupt or outdated, deleting them can improve the performance of games. This generates new shaders that give better performance according to the latest state of the system.
Is the Shader Cache rebuilt automatically?
Yes, whenever you open a game or graphics-related application, Windows automatically rebuilds the Shader Cache as needed.
Which method is better between Disk Cleanup and Settings?
Both methods are useful. Settings are simple and visual, while Disk Cleanup gives you more control. You can choose any method according to your convenience.
Is it necessary to restart the computer after deleting the Shader Cache?
Yes, it is necessary to restart the computer after deleting the Shader Cache so that all changes can take effect.