If you’re looking for the correct way to enable Sound Equalization in Windows 11, this detailed guide will explain each step clearly. Sometimes our system volume can be too loud or too soft. In such cases, the Sound Equalization feature balances all audio levels, providing a consistent sound experience during movies, games, music, and online meetings.
In this article, we’ll explore how to enable Sound Equalization in Windows 11, what to do if the option isn’t visible, and how to improve audio quality using advanced settings.
What is Sound Equalization and How Does It Work?
Sound Equalization is a built-in audio enhancement feature that controls fluctuations in system sound. When a video suddenly becomes louder or dialogue becomes softer, this feature balances the sound to maintain a consistent level.
It’s especially useful in these situations:
While watching movies and web series
While playing games
During online classes or meetings
During music playback
Step-by-step guide to enabling sound equalization in Windows 11
Step 1: Open Sound Settings
1. Click the Start button
2. Go to Settings
3. Click System
4. Then select the Sound option
Step 2: Select an Output Device
Click your Speakers or Headphones in the “Output” section.
Make sure you’re selecting the device you use regularly.
Step 3: Access Audio Enhancements
1. Scroll down
2. Go to the Advanced section
3. Click More sound settings
A new window will open.
Step 4: Go to the Enhancements tab
1. Right-click your audio device
2. Select Properties
3. Now go to the Enhancements tab
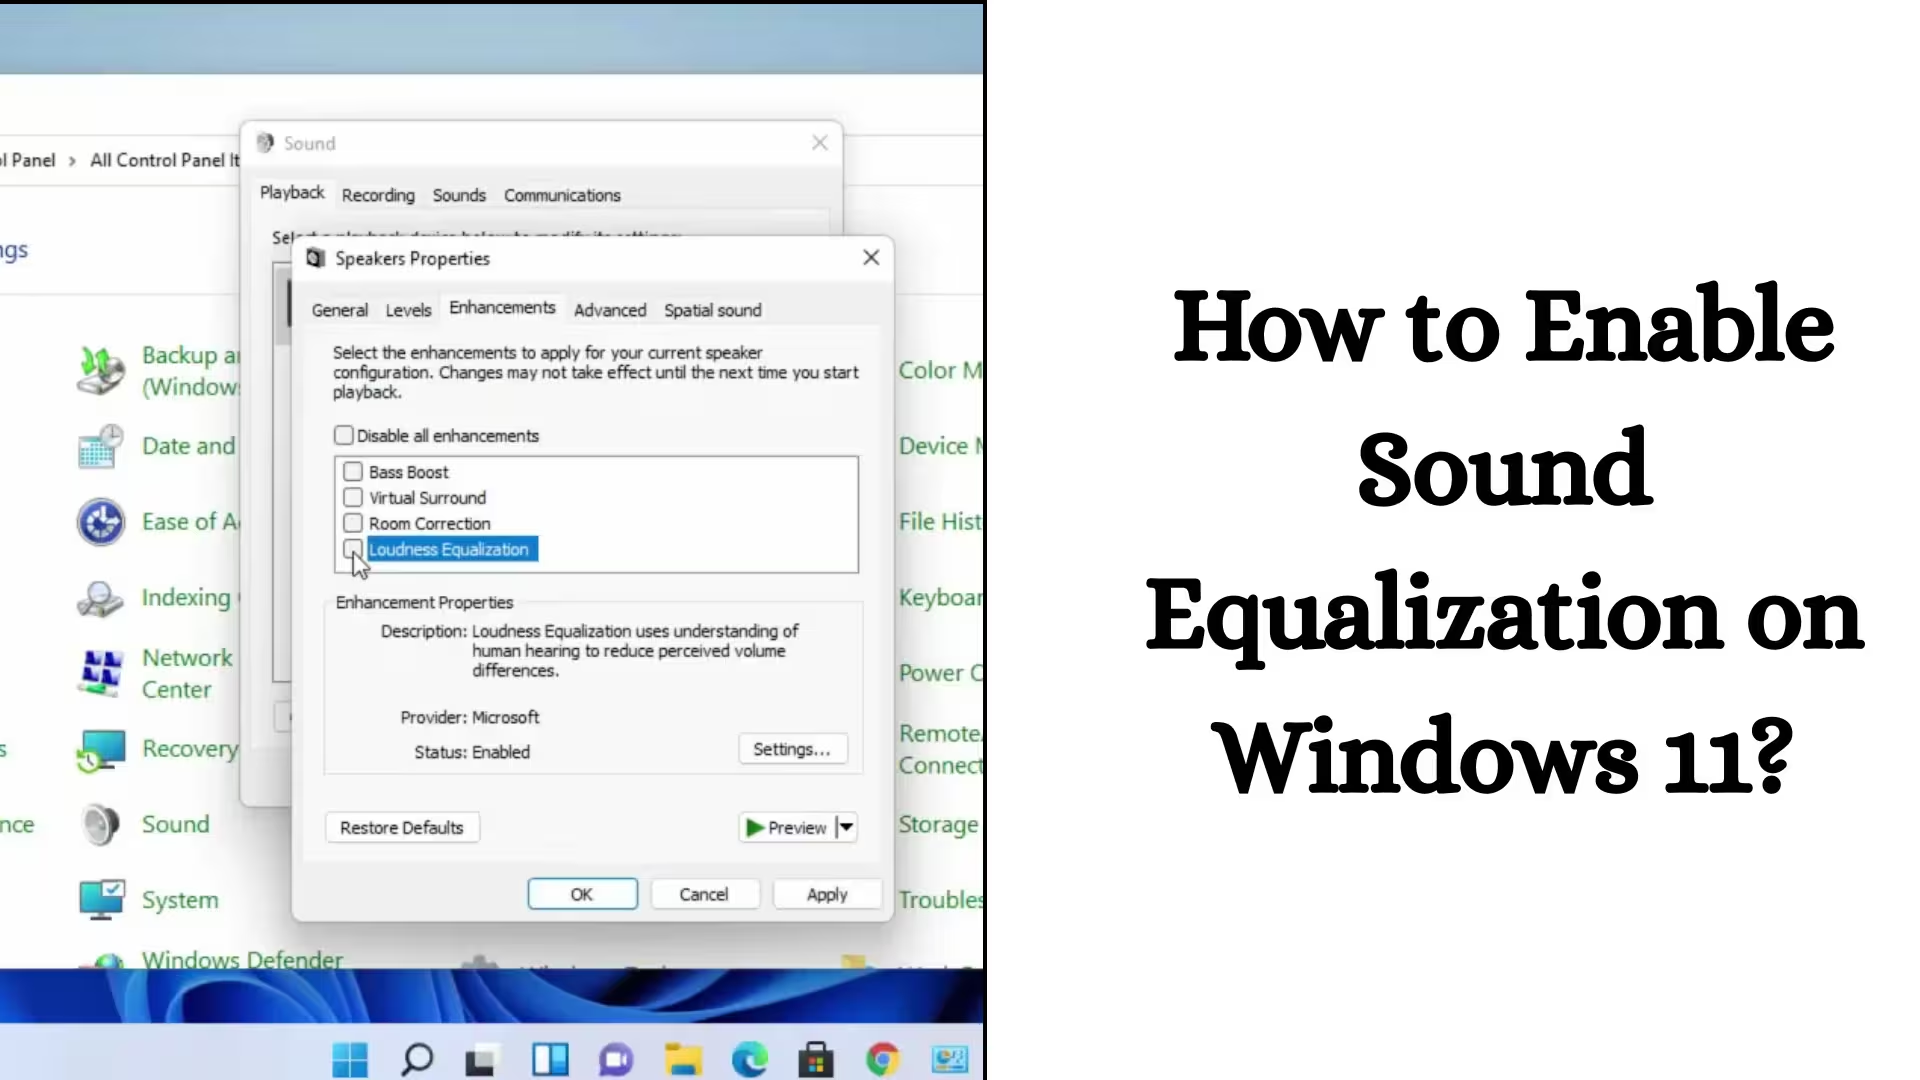
Step 5: Enable Loudness Equalization
Find the Loudness Equalization option in the list
Tick the box next to it
Press Apply and then OK
Sound Equalization has now been successfully enabled on your system.
What to do if the Loudness Equalization option isn’t visible?
Sometimes this feature isn’t visible in Windows 11. In such a case, try the solutions below:
1. Update the Audio Driver
1. Right-click on Start
2. Open Device Manager
3. Click on Sound, video, and game controllers
4. Right-click on your audio device
5. Select Update driver
If the driver is out of date, the Equalization option may appear after updating.
2. Install a High Definition Audio Driver
Sometimes the Enhancements tab disappears due to a generic driver. In this case:
Uninstall the driver from Device Manager
Restart the system
Windows 11 will automatically install the correct driver
3. Restart the Audio Service
1. Press Windows + R
2. Type `services.msc`
3. Search for Windows Audio
4. Right-click and restart
Advanced Customization of Sound Equalization in Windows 11
If we’re not satisfied with just Loudness Equalization, we can also use additional options.
Using Equalizer Settings
Some systems also have an Equalizer option in the Enhancements tab. In this, we can:
Increase the bass level
Adjust the treble
Create a custom audio profile
Use third-party equalizer software
If equalization isn’t available in Windows 11, we can use additional software such as:
Realtek Audio Console
Equalizer APO
FXSound
These can further enhance the audio experience.
Benefits of Enabling Sound Equalization
When we enable sound equalization in Windows 11, we gain several benefits:
Uniform sound levels
Clear dialogue
Protection against sudden loud noises
A better gaming experience
Clear sound even at low volumes
Differences in sound equalization between laptops and desktops
This feature is available by default on most laptops, but on some desktop systems, it depends on the audio driver. If this option isn’t available on your desktop, you’ll need to consider driver installation.
Precautions when enabling Sound Equalization in Windows 11
Choose the correct output device
Keep drivers updated
Don’t forget to press Apply
Check again after restarting
How to Disable Sound Equalization?
If we want to turn this feature off:
1. Open Sound Settings
2. Go to More sound settings
3. Open the Enhancements tab
4. Uncheck Loudness Equalization
5. Apply → OK
Additional Ways to Improve Audio Quality in Windows 11
Enable Spatial Sound
Change the Sample Rate
Set the Audio Format to 24-bit
Compare with Disabling Sound Effects
Conclusion
Enabling Sound Equalization in Windows 11 is a very simple process. By following the right steps, we can improve our system’s audio quality to professional levels. If the Enhancements tab doesn’t appear, solutions like driver updates and service restarts prove effective.
With the right settings, our Windows 11 experience becomes more balanced, clear, and better.
FAQ – How to Enable Sound Equalization in Windows 11?
1. How to Enable Sound Equalization on a Windows 11 PC?
To turn on Sound Equalization in Windows 11:
Go to Settings → System → Sound → Advanced → More Sound Settings.
Double-click your Output Device (Speakers/Headphones) → Open the Enhancements tab → Tick Loudness Equalization → Press Apply and OK.
2. How to Turn on Audio Equalization?
To turn on Audio Equalization:
1. Open Sound Settings
2. Select your audio device
3. Go to Device Properties → Enhancements tab
4. Enable the Equalizer or Loudness Equalization option
3. How to Enable Loudness Equalization in Windows 11 24H2?
The process is similar in Windows 11 24H2:
Settings → System → Sound
Scroll down and select More Sound Settings
Open your audio device’s Properties
Enable Loudness Equalization under the Enhancements tab
If the option isn’t visible, update your audio driver.
4. How to turn on Loudness Equalization in Windows?
1. Control Panel → Hardware and Sound → Sound
2. Select your Output Device
3. Properties → Enhancements
4. Click Loudness Equalization and select Apply
5. How to activate EQ (Equalizer)?
To activate EQ:
Go to Sound Settings
Open the Enhancements tab
Enable the Equalizer option if it’s available
Adjust Custom Bass and Treble settings
If EQ isn’t available, software like Realtek Audio Console can be used.
6. Does Windows 11 have a sound equalizer?
Yes, Windows 11 has a built-in sound equalizer, but it depends on the driver on each system. On most systems, it’s called Loudness Equalization.
7. How to Improve Audio Quality in Windows 11?
To improve audio quality:
Enable Loudness Equalization
Turn on Spatial Sound
Set the 24-bit audio format
Keep audio drivers updated
Customize equalizer settings
8. How to set the EQ for the best sound?
For better sound:
Slightly increase the bass
Keep the mids and treble balanced
Enable Loudness Equalization
Don’t set the volume above 80% to avoid distortion
9. Where can I find the Windows Equalizer?
The Windows Equalizer is typically found here:
Settings → System → Sound → More Sound Settings → Device Properties → Enhancements Tab
If the Enhancements tab isn’t visible, you may need to install or update your audio driver.
Are you searching for the best hosting plan? Click now and get 20% off