We often need to hide a specific drive on a Windows computer. Often, multiple people share the same computer, so hiding a drive is a very useful way to protect personal files, office documents, or sensitive data.
In this detailed guide, we’ll explain how to hide any specific drive in Windows. We’ll explain several effective methods that can help you easily hide a drive using File Explorer, Group Policy Editor, Registry Editor, and Disk Management.
Why is it Necessary to hide a Drive in Windows?
We may need to hide a Windows drive in several situations. For example:
- Protecting personal data
- Hiding important files from other users
- Limiting data access on an office computer
- Keeping children or other users away from a drive
When we hide a drive, it is not visible in File Explorer, preventing any user from easily accessing it.
Method 1: Hide a Specific Drive with the Group Policy Editor
This method is considered the easiest and most effective in Windows Pro and Enterprise versions.
Step-by-Step Process
1. First, press Windows + R.
2. Now, type gpedit.msc in the Run box and press Enter.
3. Now, follow this path:
User Configuration
Administrative Templates
Windows Components
File Explorer
“`
4. On the right, you will find an option: “Hide these specified drives in My Computer.”
5. Double-click on it.
6. Now, select the Enabled option.
7. In the dropdown below, you’ll find different drive options, such as:
Restrict A and B drives
Restrict C drive
Restrict D drive
Restrict A, B, C drives
8. Select the drive you want to hide.
9. Click Apply → OK.
Now, when you open This PC or File Explorer, the selected drive will no longer be visible.
Also read: How to Reset Network Settings on iPhone?
Method 2: Hiding a Drive with the Registry Editor
If the Group Policy Editor isn’t available on your system, you can also hide drives using the Registry Editor.
Registry Method Steps
1. Press Windows + R.
2. Type in Run:
regedit
3. Go to this location:
HKEY_CURRENT_USER
Software
Microsoft
Windows
CurrentVersion
Policies
Explorer
4. If the Explorer key doesn’t exist, create a new one.
5. Create a New → DWORD (32-bit Value) on the right side.
6. Name it:
“`
NoDrives
“`
7. Double-click it.
8. Enter the number of the drive to be hidden in the Value Data field.
Drive Value Codes
| Drive | Value |
| —– | —– |
| A | 1 |
| B | 2 |
| C | 4 |
| D | 8 |
| E | 16 |
| F | 32 |
For example:
Value = 4 to hide the C drive
Value = 8 to hide the D drive
9. Close the Registry and restart the computer.
That drive will now be hidden from File Explorer.
Also read: Windows 11 Time Not Updating or Showing Wrong Time? 11 Ways to Fix It
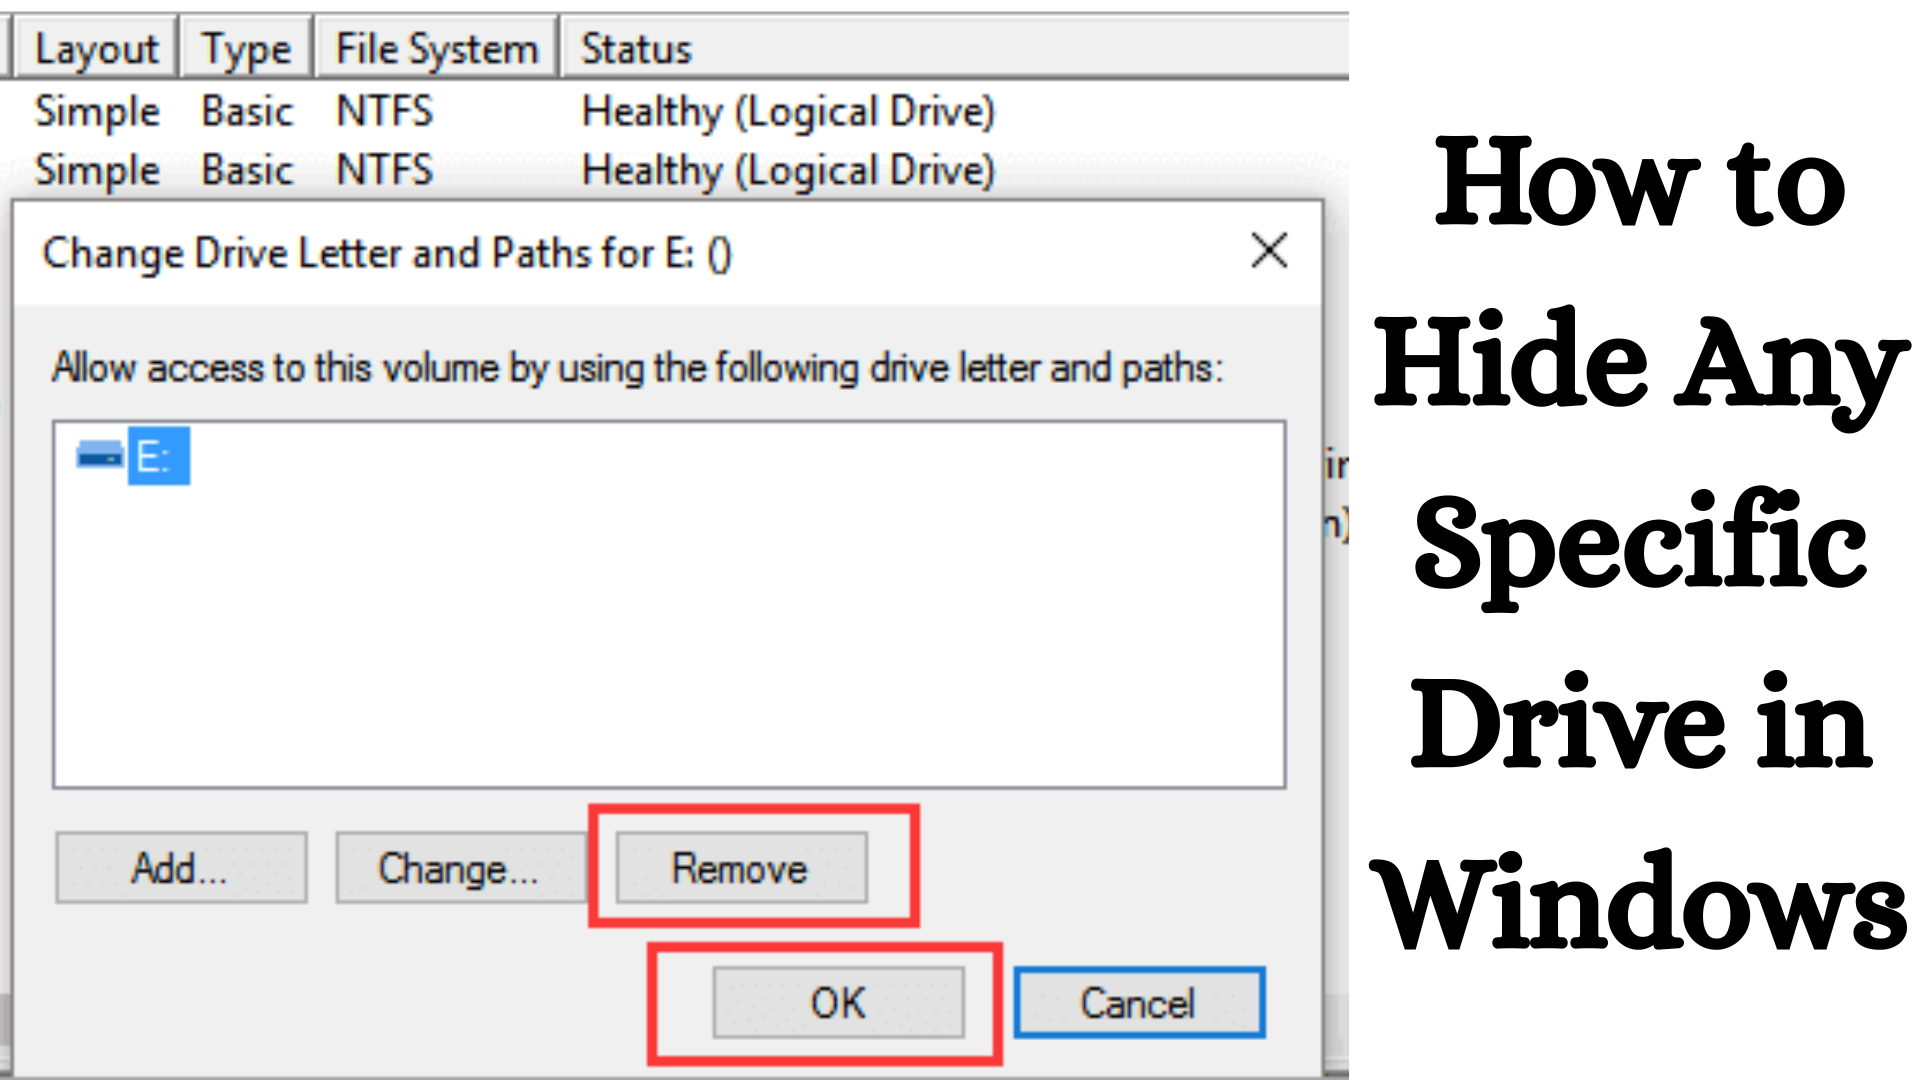
Method 3: Hiding a Drive from Disk Management
This method is also quite simple and involves hiding the drive by removing its drive letter.
Step-by-Step Process
1. Press Windows + X.
2. Open Disk Management.
3. Right-click on the drive you want to hide.
4. Now click:
Change Drive Letter and Paths
5. Select the drive letter and click Remove.
6. Confirm.
The drive will no longer be visible in This PC.
But keep in mind that this method only removes the drive letter, it does not completely lock the drive.
Method 4: Hiding a Drive from Command Prompt
You can also hide a drive using Command Prompt.
Steps
1. Open Command Prompt in Administrator Mode.
2. Now type this command:
diskpart
3. Press Enter.
4. Now type:
list volume
5. Note the volume number of the drive you want to hide.
6. Now type:
select volume 3
7. Now run this command:
remove letter D
Now the D drive will be hidden.
How to show the hidden drive again
If you want to unhide the hidden drive later, you’ll need to do the same process in reverse.
In Group Policy
Select Not Configured.
In Registry Editor
Delete the NoDrives value.
In Disk Management
Add Drive Letter
After this, the drive will be visible in File Explorer again.
Things to Keep in Mind When Hiding a Drive in Windows
Whenever you hide a Windows drive, keep a few important things in mind:
This only hides drive visibility.
Advanced users can still access it with certain tools.
Use encryption or password protection to completely secure the drive.
Be cautious before hiding the system drive (C Drive).
Benefits of Hiding a Drive
Hiding a drive in Windows offers several benefits:
1. Data Security
Personal and office data remains safe.
2. Protection from Unauthorized Access
Other users cannot easily access your data.
3. System Organization
The system appears more organized.
4. Privacy Protection
Your personal information remains secure.
Conclusion
Hiding specific drives in Windows is a very useful feature, especially when multiple people share the computer. In this guide, we’ve covered several effective methods, including Group Policy Editor, Registry Editor, Disk Management, and Command Prompt.
Using these methods, you can easily hide any drive in Windows 10 and Windows 11 and protect your important data.
If you want to make your computer more secure and organized, using the Drive Hide feature is a great solution.
FAQ – Common Questions About Hiding Specific Drives in Windows
1. How do I hide a specific drive on my computer?
You can use several methods to hide any drive on a Windows computer. The easiest way is to use Group Policy Editor, Registry Editor, or Disk Management. Using these methods, you can hide any drive, such as C, D, or E, from File Explorer so that it doesn’t appear in “This PC.”
2. Can drives be hidden in Windows 11?
Yes, drives can be easily hidden in Windows 11. You can use Disk Management, Group Policy Editor, Registry Editor, or Command Prompt. When a drive is hidden, it is no longer visible in File Explorer, preventing other users from easily accessing it.
3. How do I hide a folder on the D drive?
If you want to hide a folder on the D drive, follow the steps below:
1. Right-click on the folder you want to hide.
2. Click Properties.
3. Tick the Hidden option below.
4. Click Apply and OK.
After this, the folder will be hidden and will not be visible normally.
4. How do I hide these specified drives on my computer?
You can use the Group Policy Editor to hide specified drives.
Steps:
1. Press Windows + R
2. Type gpedit.msc
3. Go to the path
User Configuration → Administrative Templates → Windows Components → File Explorer
4. Click Hide these specified drives in My Computer
5. Select the drive and apply.
After this, the selected drive will no longer be visible in This PC.
5. Can you hide a mapped drive?
Yes, a mapped drive can be hidden. You can do this by disconnecting the network drive or blocking it from appearing in File Explorer through Group Policy settings.
6. How do you hide a shared drive?
If you want to hide a shared drive, you need to change the Network Sharing Settings or Drive Permissions. You can also hide the shared drive by removing the drive letter, making it invisible to regular users.
7. Does hiding a shared drive hide it for everyone?
No, hiding a shared drive doesn’t necessarily hide it completely from all users. This depends on how you’ve set up your Network Permissions and User Access Settings. If set correctly, you can hide a drive from specific users.
Are you searching for the best hosting plan? Click now and get 20% off