The correct configuration of network settings in Windows 11 is extremely important for the security and connectivity of your device. Network profiles are classified into “Public”, “Private,” and “Domain”, and selecting the right profile can make your networking experience secure and organized. In this article, we will explain in detail how to change the network profile type in Windows 11.
What is a network profile type?
When you connect to a new network, Windows asks you whether you want to set that network as Private or Public.
Private network: When you connect to a secure network in your home or office, it is better to keep it Private.
Public network: When you connect to a cafe, hotel or an unknown network, it should be kept Public so that your device remains hidden from other devices.
Ways to change the network profile type in Windows 11
1. Changing network profile type from Settings app
Step-by-step guide:
1. Click on the Start Menu and open Settings.
2. Go to the Network & Internet section.
3. Now click on the network you are connected to (Wi-Fi or Ethernet).
4. Scroll down and find the Network Profile Type section.
5. Here you will find two options:
Public
Private
6. Select the profile as per your requirement.
Tip: If you are on a home network, select the “Private” option.
2. Changing the network profile using PowerShell
If you are a tech-savvy user, you can also change the network profile using Windows PowerShell.
Steps:
1. Go to the Start Menu and open PowerShell as Run as Administrator. 2. Type the below command to see the list of available network profiles:
“`powershell
Get-NetConnectionProfile
“`
3. Now change the network profile with the following command:
“`powershell
Set-NetConnectionProfile -Name “NetworkName” -NetworkCategory Private
“`
If you need to change the network to Public, then type `Public` in place of `Private`.
3. Changing the Network Profile Type Using Registry Editor
If the above methods don’t work, you can resort to Registry Editor. However, this is an advanced process, so do it carefully.
Steps:
1. Open Run (Windows + R) and type: `regedit`
2. Go to the below path:
“`
HKEY_LOCAL_MACHINE\SOFTWARE\Microsoft\Windows NT\CurrentVersion\NetworkList\Profiles
“`
3. Here, you will find several subfolders, each of them representing a network profile.
4. Look for an entry named “ProfileName” in each folder to know which network it belongs to.
5. Now find the DWORD entry named “Category” and change its value:
0 = Public
1 = Private
2 = Domain
6. Restart the system after the change.
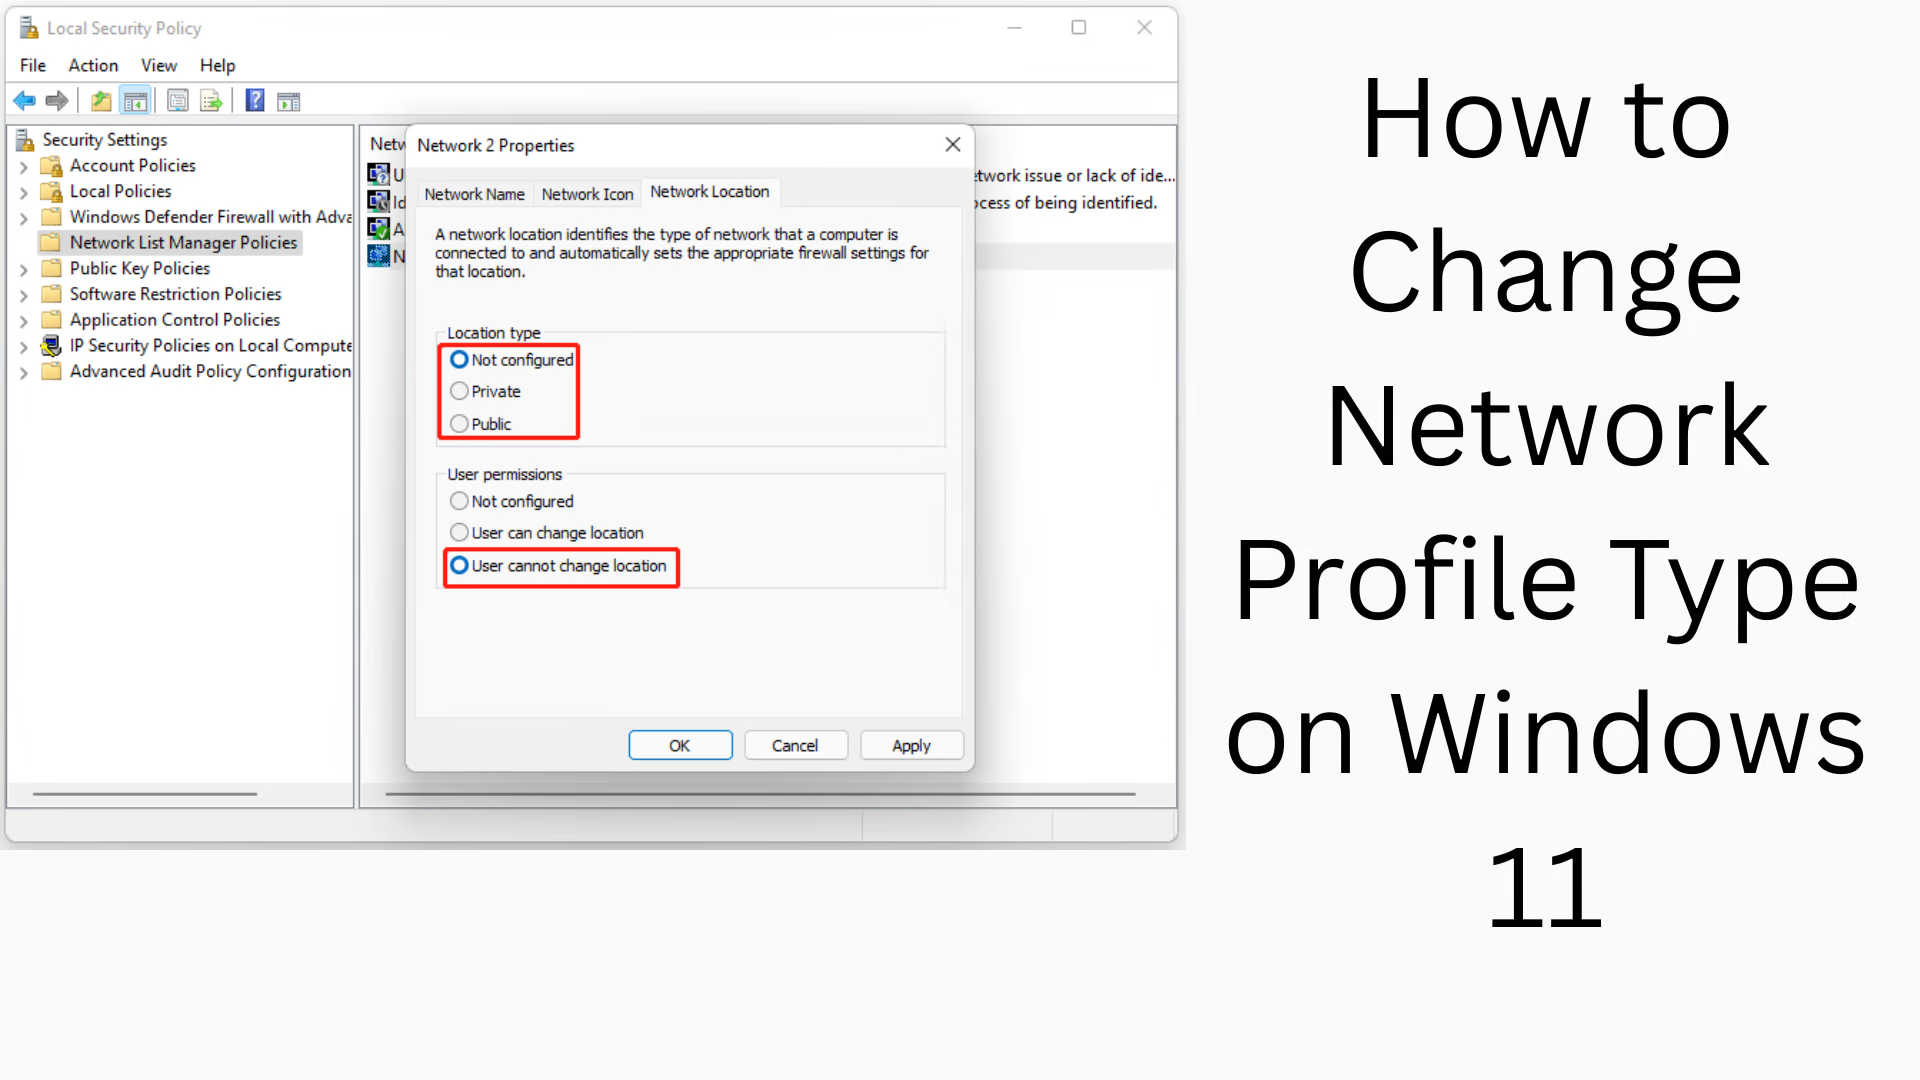
4. Setting up network profiles through Group Policy Editor (for Pro and Enterprise users only)
If you are a Windows 11 Pro or Enterprise user, you can also use Group Policy Editor.
Steps:
1. Open Run (Win + R) and type: `gpedit.msc`
2. Go to the below path:
“`
Computer Configuration > Windows Settings > Security Settings > Network List Manager Policies
“`
3. Here you see the profile of available networks and double-click.
4. Go to the “Network Location” tab and select the Private or Public option.
#Benefits of changing network profile
Improved security: In public networks, your device remains hidden from other devices, which reduces the risk of viruses and hacking.
Convenience in sharing: You can easily share files, printers, and other resources in a private network.
Better control of network settings: When you select the right profile, Windows adjusts your system’s firewall and security rules accordingly.
What to do when the network profile option is not visible?
Sometimes it happens that the Network profile option is not visible in the Settings app; in such a case, try the solutions given below:
Update the network driver.
Update Windows.
Reset the network:
Settings → Network & Internet → Advanced network settings → Network reset
Conclusion
Changing the network profile type in Windows 11 is a simple but important process that can increase both the security and convenience of your network. We hope that with all the above methods you will be able to easily control the network settings of your system.
Want to grow your business organically? Contact us now
Frequently Asked Questions (FAQs)
Q1: What is a network profile in Windows 11?
Answer: A network profile determines how your device will interact with the network. It is of three types – Public, Private, and Domain. In the Public profile, your device is hidden from other devices, while in the Private profile, you can share files and printers.
Q2: How do I know which network profile my device is on?
Answer: You can go to Settings > Network & Internet > Wi-Fi/Ethernet and see which network your device is connected to and what profile it is (Public or Private).
Q3: How to change network profile from PowerShell?
Answer: Open PowerShell and type the below command:
powershell
Copy
Edit
Set-NetConnectionProfile -Name “your network name” -NetworkCategory Private
You can also make it public by writing Public in place of Private.
Question 4: What to do if the option to change network profile is not visible in Settings?
Answer:
Update network driver
Update Windows
Use PowerShell or Registry Editor
Use Group Policy Editor (in Pro version)
Question 5: What is the benefit of changing the network profile?
Answer: It increases the security of your device, you can control file and printer sharing, and get better control over network-related settings.
Question 6: Is a domain profile available for home users?
Answer: No, the domain profile is only for devices that are connected to a corporate or educational network domain.
Question 7: Does the same process apply to both Wi-Fi and Ethernet?
Answer: Yes, the process to change the network profile for both Wi-Fi and Ethernet network connections in Windows 11 is almost the same.
Question 8: Is it safe to change the network profile from Registry Editor?
Answer: Yes, but this method is for advanced users. It is a good idea to make a backup before making any changes.
Question 9: Is Group Policy Editor available to all Windows 11 users?
Answer: No, it is only available in Windows 11 Pro, Enterprise, and Education editions. Home edition users cannot access it.
Question 10: Is it necessary to restart the computer after changing the profile?
Answer: Usually not required, but restarting may be beneficial if the profile change does not show its effect immediately.