If the audio on your Windows 11 computer sometimes sounds too loud and at other times too quiet, this is a common issue. Sudden fluctuations in volume while watching videos, playing games, attending meetings, or listening to music can be extremely frustrating. In such situations, the Volume Normalize feature proves to be highly useful. Through this feature, the system balances the audio levels across different apps and media sources, ensuring a consistent audio level throughout.
In this comprehensive guide, we share all the effective methods, settings, and advanced solutions for how to normalize volume in Windows 11.
What is Volume Normalization in Windows 11?
Volume Normalization is a process in which the system regulates the audio output to strike a balance between loud and soft sounds.
This results in:
Protection against sudden bursts of loud noise
Consistent sound levels across different applications
An improved listening experience for movies, music, and calls
A more comfortable listening experience when using headphones
In Windows 11, this feature is available in various forms, such as:
Loudness Equalization
Spatial Sound Controls
App Volume Mixer
Audio Enhancements
Driver Software Settings
The Easiest Way to Normalize Volume in Windows 11
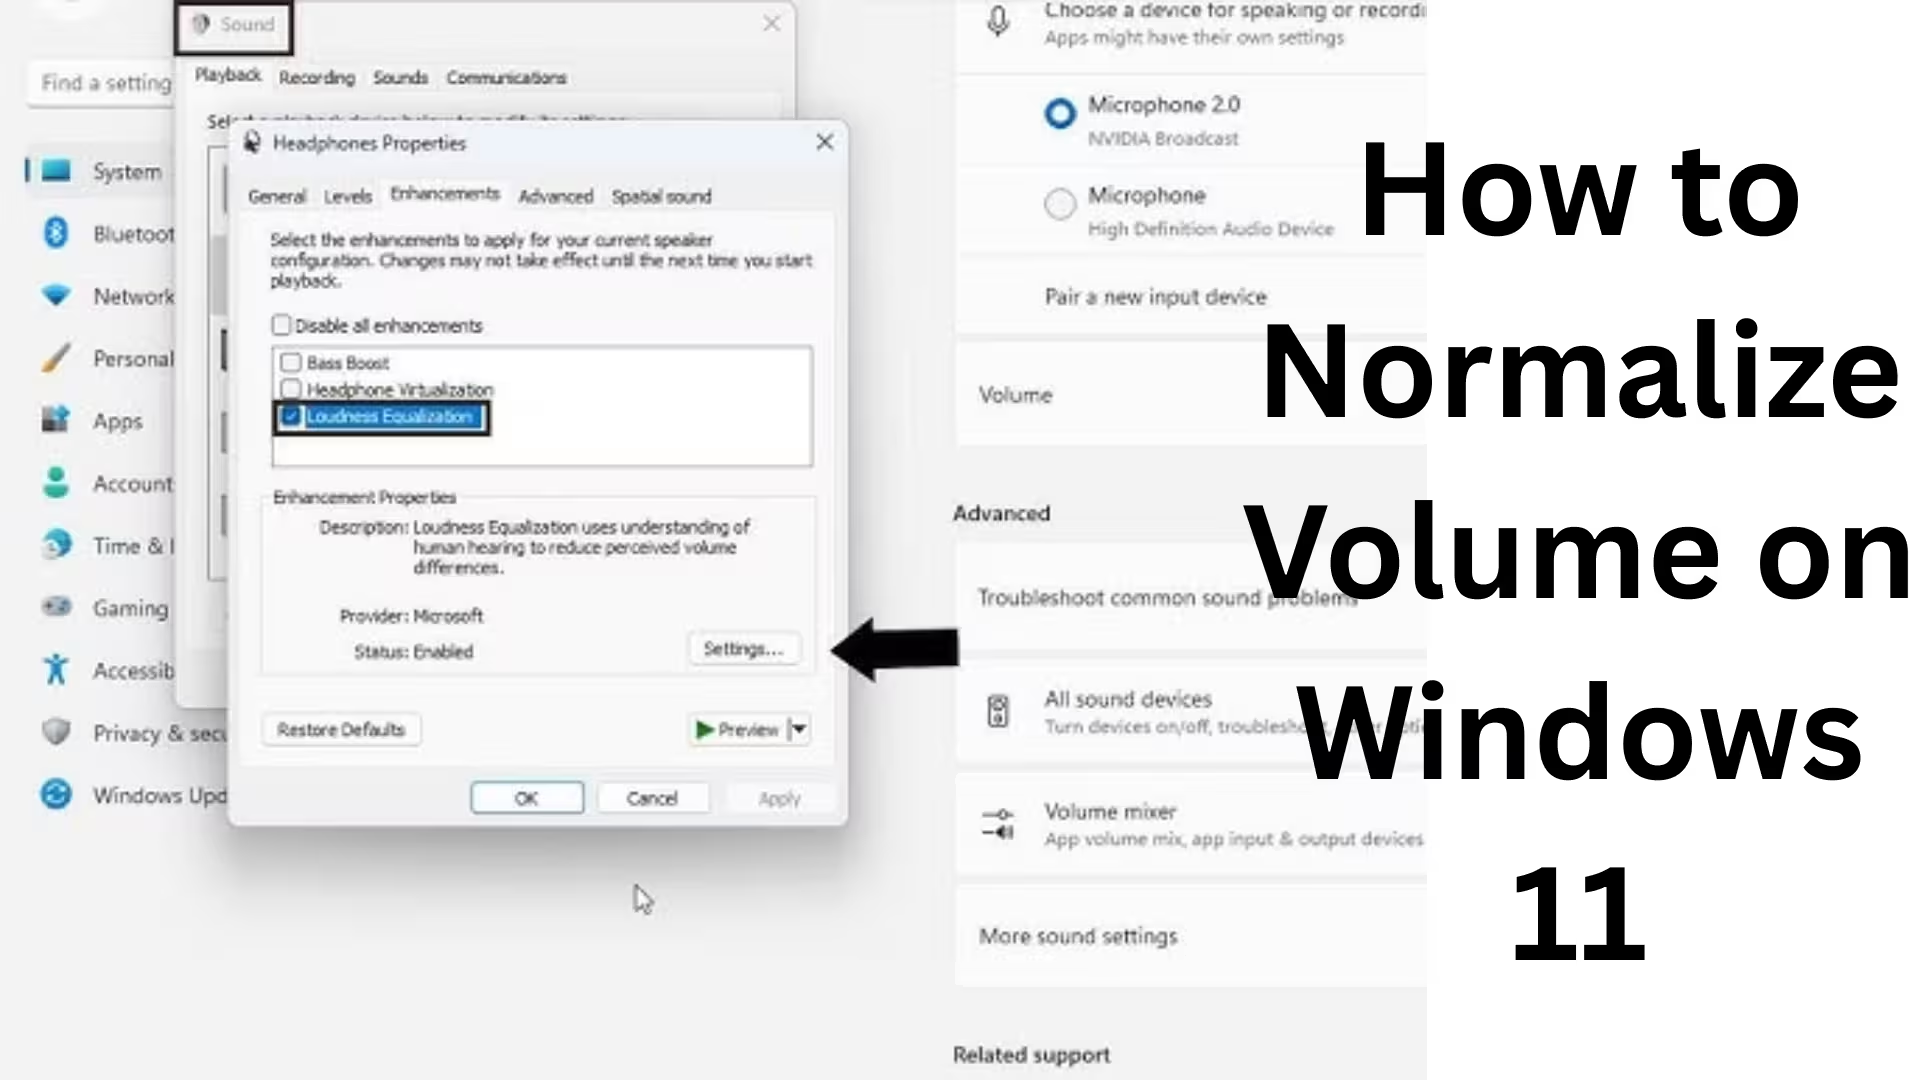
1. Enable Loudness Equalization
This is the most popular method available in Windows.
Steps:
1. Open the Start Menu
2. Go to Settings
3. Select System > Sound
4. Scroll down and click on More Sound Settings
5. Double-click on your speaker or headphone device
6. Open the Enhancements tab
7. Check the box for Loudness Equalization
8. Click Apply > OK
Your system’s audio should now be much more balanced.
2. Enable Audio Enhancements via Settings
In Windows 11, built-in audio enhancements are available for certain devices. Steps:
1. Open Settings
2. Go to System > Sound
3. Select your Output Device
4. Toggle the Enhance Audio option ON
This option improves and stabilizes the audio quality.
3. Equalize Volume for Individual Apps using the Volume Mixer
Often, the issue lies not with the system itself, but with individual applications.
Steps:
1. Right-click on the Speaker Icon in the Taskbar
2. Select Open Volume, Mixer
3. Balance the volume levels for all applications
Example:
Chrome – 70%
VLC – 80%
Zoom – 65%
Spotify – 75%
This will minimize the volume disparity between different applications.
Also read: How to Enable and Use Controlled Folder Access in Windows 11?
4. Normalize Audio using the Realtek Audio Console
If your system is equipped with a Realtek Audio Driver, this may be the best solution.
Steps:
1. Search for Realtek Audio Console in the Start Menu
2. Open the application
3. Navigate to the Sound Effects or Enhancements section
4. Toggle Loudness Equalization ON
5. Click Apply
This feature works exceptionally well on systems utilizing Realtek audio drivers.
5. Enable Volume Normalization within Media Players
In many cases, the issue stems not from Windows but from the media player itself.
VLC Media Player
1. Open VLC
2. Go to Tools > Preferences
3. Navigate to Audio Settings
4. Toggle Normalize Volume ON
Spotify
Go to Settings > Toggle Normalize Volume ON
YouTube
Volume can be balanced using browser extensions or equalizer tools
What to do if Loudness Equalization is missing in Windows 11
Many users report that this option does not appear for them. This is typically due to the audio driver. Solution:
1. Update Audio Driver
1. Right-click on Start
2. Open Device Manager
3. Expand Sound, video, and game controllers
4. Select the Audio Driver
5. Click Update Driver
2. Install Manufacturer-Specific Drivers
HP
Dell
Lenovo
ASUS
Acer
Download the original drivers directly from their respective websites.
3. Remove Generic Drivers
Windows sometimes automatically installs basic drivers, which can cause advanced enhancement options to disappear.
How to Balance Volume using an Equalizer
If the audio output is significantly unbalanced, an Equalizer can help.
Best Free Tools:
Equalizer APO
FxSound
Boom 3D
Realtek Console
With these tools, you can:
Control Bass
Control Treble
Control Loudness
Apply Surround Effects
Normalize Audio Output
How to Normalize Volume in Headphones
If the issue is specific to your headphones:
Steps:
1. Reconnect your Bluetooth headphones.
2. Open Device Properties.
3. Keep Mono Audio OFF.
4. Test Spatial Audio (Toggle OFF/ON).
5. Use the dedicated Headphone App (Sony, JBL, Boat, etc.).
Best Volume Normalization Settings for Gaming
In gaming, sudden gunshots or explosion sounds can be extremely loud.
Recommended Settings:
Loudness Equalization: ON
Spatial Sound: ON
Master Volume: 80%
In-game Dynamic Range: Low
These settings are also beneficial for competitive gaming.
Volume Normalization for Meetings and Calls
Audio levels can vary significantly across platforms like Zoom, Teams, and Google Meet.
Do This:
Turn OFF Microphone Boost.
Turn ON Speaker Enhancements.
Stabilize the meeting app’s volume using the App Volume Mixer.
Enable Noise Suppression.
Advanced Audio Tweaks via the Registry
Advanced users can modify certain audio controls via the Registry; however, caution is advised.
Run:
`regedit`
Then, navigate to audio-related paths to check and adjust enhancement settings.
Do not attempt this method if you lack the necessary technical experience.
Repair Audio Issues via Command Prompt
If your audio features are not functioning correctly:
“`cmd
sfc /scannow
“`
Then:
“`cmd
DISM /Online /Cleanup-Image /RestoreHealth
“`
This will repair your system files.
Windows 11 Volume Normalization Not Working? Solutions
1. Restart your PC
2. Run the Audio Troubleshooter
3. Reinstall Audio Drivers
4. Run Windows Update
5. Test a Different Output Device
6. Try Connecting a USB Headset
Also read: 7 Ways to Disable Automatic Chrome Updates in Windows
Best Settings for Perfectly Balanced Sound
If you use your PC for daily tasks, keep these settings enabled:
System Volume – 75%
Loudness Equalization – ON
Enhance Audio – ON
App Volume Mixer – Balanced
Realtek Enhancements – ON
Spotify Normalize – ON
Is Volume Normalization Safe?
Yes, it is a completely safe feature. It ensures that:
Your speakers are not damaged
Your headphones remain safe
The impact of sudden loud noises on your ears is minimized
When Should You Turn Off Volume Normalization?
If you are:
Performing professional music editing
Doing studio monitoring
Wanting to listen to the original dynamic sound
Then it is better to keep it turned off.
Conclusion
Volume Normalization in Windows 11 is extremely easy to set up and is a highly useful feature for daily use. If your system suffers from audio that is sometimes too loud and other times too quiet, Loudness Equalization, Enhance Audio, the Volume Mixer, and Driver Updates are the most effective solutions. Once you apply the correct settings, your audio experience will become significantly better, clearer, and more balanced.
Frequently Asked Questions (FAQ) – How to Normalize Volume in Windows 11
1. What is Volume Normalization in Windows 11?
Volume Normalization is a feature that balances the audio output on your computer. It helps resolve issues where the volume fluctuates between being too loud and too quiet.
2. How do I enable Volume Normalization in Windows 11?
You can enable Loudness Equalization by navigating to Settings > Sound > More Sound Settings > Speaker Properties > Enhancements.
3. The “Loudness Equalization” option is not visible—what should I do?
If this option does not appear, your audio driver may be outdated. Update your driver or download the latest version from the manufacturer’s official website.
4. Is Volume Normalization available on all Windows 11 laptops?
No, this depends on your specific audio driver and sound hardware. This feature is not available on some systems.
5. Does Volume Normalization improve sound quality?
Yes, it makes the audio sound more consistent, clear, and comfortable to listen to.
6. Does this feature work with headphones as well?
Yes, provided your system supports it, this feature can work on both headphones and speakers.
7. Is Volume Normalization good for gaming?
Yes, it is useful for reducing sudden loud noises during gaming—especially in shooting and action games.
8. Can Volume Normalization damage my speakers?
No, it is a safe feature and does not cause any damage to your speakers.
9. What should I do if the audio still sounds unbalanced?
Open the Volume Mixer to manually adjust the volume levels for individual applications, and ensure your audio driver is up to date.
10. What is the best method to use on Windows 11?
The best approach is to:
Turn ON “Loudness Equalization.”
Enable “Enhance Audio.”
Balance the volume levels for your applications using the Volume Mixer.
11. Does Volume Normalization work with Bluetooth headphones?
Yes, it works with certain Bluetooth devices; however, this depends on the specific driver and device support.
12. Should I keep this feature enabled while listening to music?
If you are an average user, keeping it enabled is a good idea. However, for professional audio editing purposes, it is better to keep it disabled.
13. Do media players like VLC or Spotify also have a Volume Normalization feature?
Yes, many media players—such as VLC and Spotify—offer a dedicated “Normalize Volume” option within their settings.
14. Could this feature disappear after a Windows Update?
Occasionally, this option may vanish when the driver is changed. In such cases, reinstall the driver.
15. Why does the volume suddenly increase in Windows 11?
This can be caused by various apps, browser ads, media files, or driver issues. Volume Normalization resolves this to a significant extent.