If new hardware installed on your Windows PC is not appearing, a device stops working after a driver update, or the system fails to recognize a USB device, printer, GPU, SSD, keyboard, mouse, or other peripheral, the Scan for Hardware Changes feature serves as the most useful solution. Through this process, the Windows system re-detects the hardware and loads the necessary driver configurations.
In this comprehensive guide, we will outline 5 effective methods to scan for hardware changes in Windows, enabling you to resolve device recognition issues without having to restart your system.
What is “Scan for Hardware Changes”?
When we add new hardware to a computer or remove existing hardware, Windows requires information regarding that change. Often, the system does not recognize the change immediately. In such instances, the Scan for Hardware Changes command instructs Windows to re-examine all connected devices.
This feature is useful in the following situations:
A new USB device is not being recognized.
A connected printer is not appearing.
An SSD or HDD is not visible.
Issues arise after installing a GPU or Sound Card.
A device disappears following a driver update.
An “Unknown Device” appears in the Device Manager.
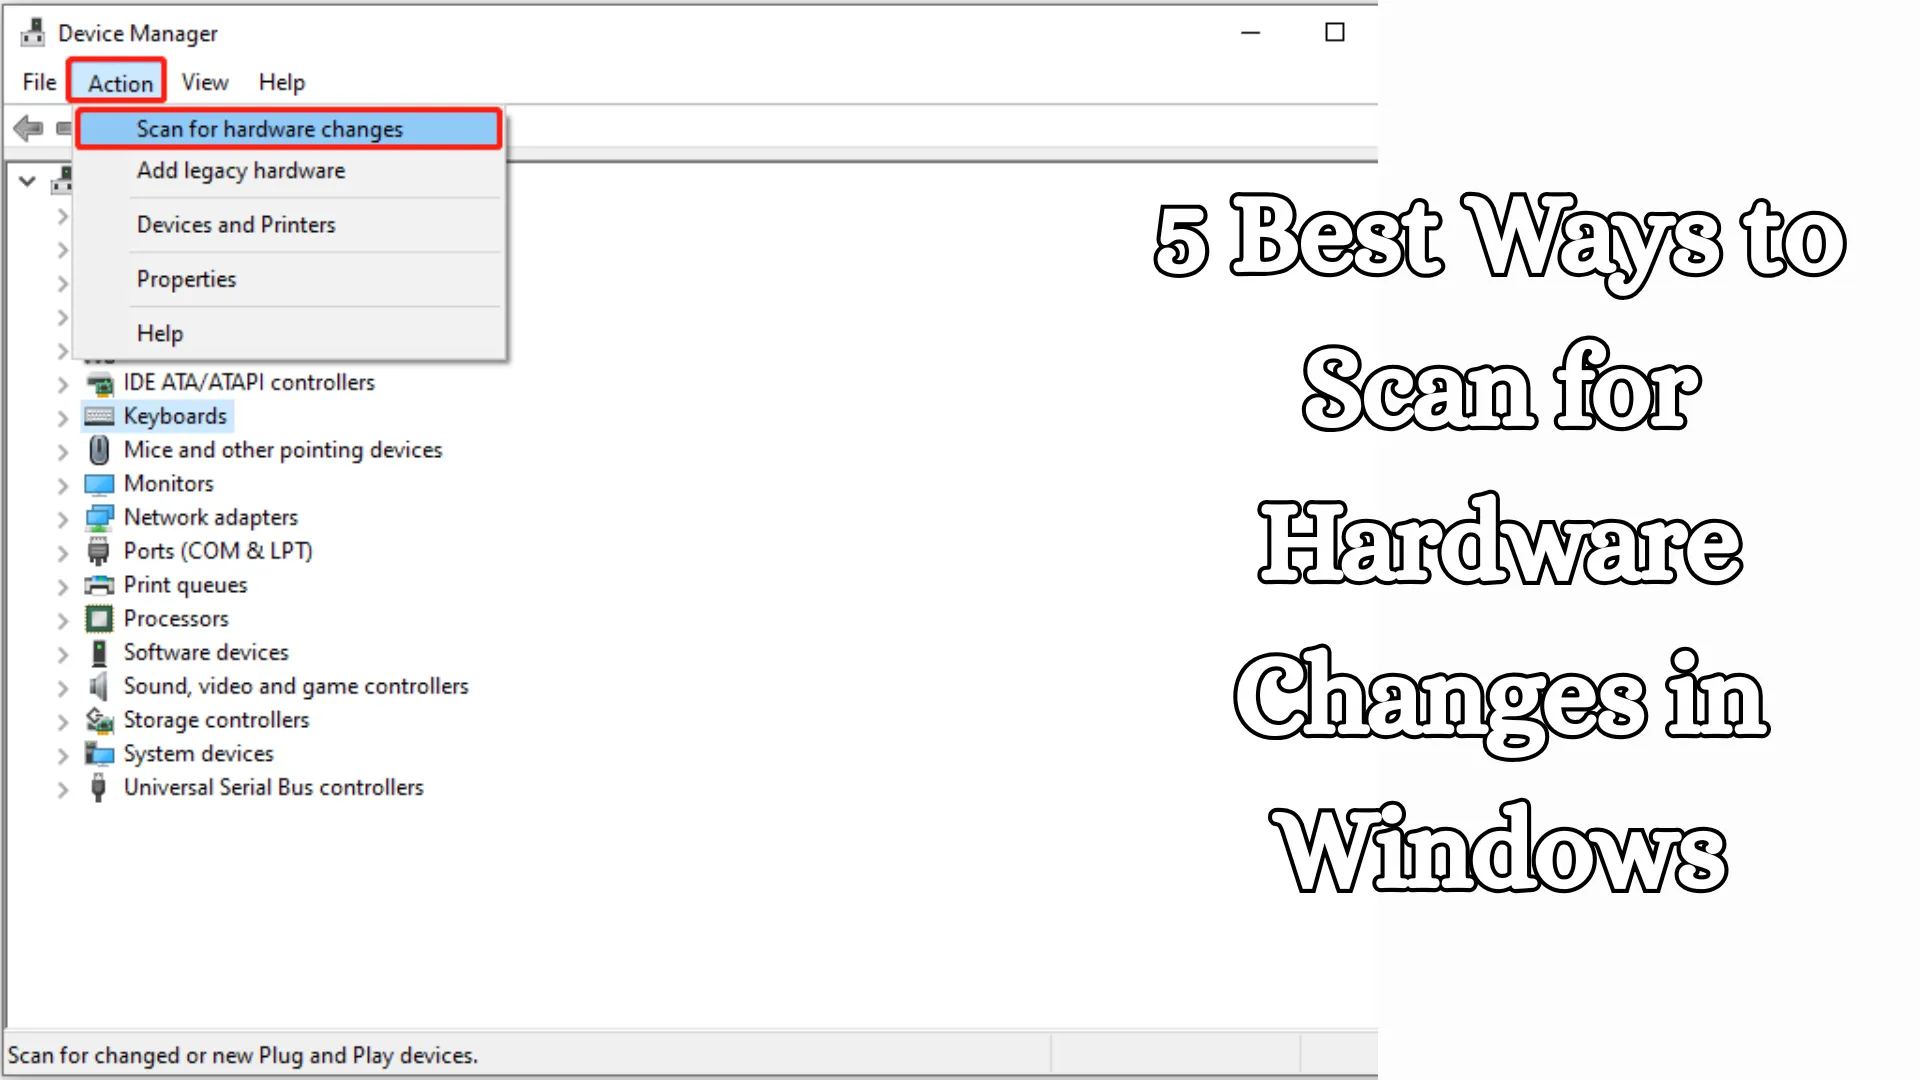
1. Scan for Hardware Changes via Device Manager
This is the easiest and most popular method.
Steps:
1. Right-click on the Start Menu.
2. Open Device Manager.
3. Navigate to the Menu Bar at the top.
4. Click on Action.
5. Select Scan for hardware changes.
Windows will immediately scan the system and search for new devices.
When to Use:
A USB device is not being detected.
The Bluetooth adapter is missing.
There are issues with the mouse or keyboard.
The printer is not appearing.
Benefits:
Simple method.
No additional commands required.
Useful for all users.
2. Scan for Hardware via Command Prompt
If Device Manager is not working or you need a faster method, use the Command Prompt.
Steps:
1. Open the Start Menu.
2. Search for CMD.
3. Select Run as Administrator.
4. Run the following command:
“`cmd
pnputil /scan-devices
“`
Windows will then scan for all hardware devices.
When to Use:
For Advanced Troubleshooting
For Remote Support
For IT Administration tasks
Benefits:
Faster process
Excellent for professional use
Useful in both Windows 10 and Windows 11
Also read: 7 Ways to Disable Automatic Chrome Updates in Windows
3. Scan for Hardware Changes via PowerShell
PowerShell is Windows’ modern administrative tool.
Steps:
1. Open the Start Menu.
2. Open Windows PowerShell (Admin).
3. Run this command:
“`powershell
pnputil /scan-devices
“`
Or
“`powershell
Get-PnpDevice
“`
Benefits:
Scripting support
Bulk system management
Better suited for Admin Users
4. Remove Hidden Devices and Rescan
Often, old drivers or “Hidden Devices” can block new hardware. In such cases, first remove the hidden devices, and then perform a scan.
Steps:
1. Open Device Manager.
2. Click on View.
3. Select Show hidden devices.
4. Remove any grayed-out devices.
5. Now, click Action > Scan for hardware changes.
When to Use:
If an old printer keeps reappearing
If there is a USB driver conflict
If there is a Bluetooth error
Benefits:
Resolves old conflicts
Detects new hardware more quickly
5. Refresh Hardware Without Restarting
If the scan method isn’t working, refresh the system by disabling and then re-enabling specific devices.
Steps:
1. Open Device Manager
2. Right-click on the problematic device
3. Select Disable device
4. Then, enable the device again
5. Now, select Scan for hardware changes
Useful Scenarios:
Wi-Fi Adapter not working
Sound Device Error
Camera not being detected
What to do if the hardware still doesn’t appear after scanning?
If the device is still not visible after scanning, try the solutions listed below:
1. Change the USB Port
Sometimes, the port itself is faulty.
2. Update Drivers
Device Manager > Update Driver
3. Check in BIOS
The Storage Drive, GPU, or USB Controller may be disabled within the BIOS.
4. Update Windows
Pending updates can sometimes interfere with hardware detection.
5. Check Cables
Loose SATA, power, or USB cables can cause issues.
Also read: How to Enable and Use Controlled Folder Access in Windows 11?
Where is “Scan for hardware changes” located in Windows 11?
In Windows 11, this feature is also available within Device Manager.
Shortcut Method:
Win + X
Device Manager
Action
Scan for hardware changes
How to “Scan for Hardware Changes” in Windows 10?
The process in Windows 10 is nearly identical.
Right-click on Start
Select Device Manager
Click on Action
Select Scan for hardware changes
Most Common Hardware Issues
USB Device Not Recognized
Often resolves immediately after a scan.
External Hard Drive Missing
The disk may become detectable.
Bluetooth Missing
The driver gets reloaded.
Printer Offline
Windows re-detects the printer.
Graphics Card Problem
The GPU driver may reinitialize.
Open Device Manager via Keyboard Shortcut
The quick method:
“`text
Win + X
“`
Then select Device Manager.
Alternatively:
“`text
Win + R
devmgmt.msc
“`
Benefits of Scanning for Hardware Changes
Troubleshooting without a system restart
Immediate detection of new devices
Reloading of missing drivers
Fixing USB-related issues
Identification of unknown devices
Time-saving
When Should You Scan?
Perform a scan immediately in these situations:
You have installed new RAM or an SSD.
A USB device is connected but not appearing.
You have just installed a driver.
Bluetooth functionality has disappeared.
The printer cannot be found.
An audio device is missing.
Safety Tips
Install only trusted hardware.
Do not install drivers from unknown sources.
Maintain system restore points.
Use official drivers provided by the manufacturer.
Conclusion
If your Windows system is failing to recognize a new device, Scan for Hardware Changes is the fastest and safest solution available. We have outlined 5 effective methods above—using Device Manager, CMD, PowerShell, removing hidden devices, and the Refresh method. These techniques allow you to resolve most hardware-related issues instantly.
Frequently Asked Questions (FAQ)
1. What does “Scan for Hardware Changes” do in Windows?
This feature helps the Windows system re-examine and identify new or removed hardware devices. It allows missing devices—such as USB devices, printers, SSDs, Bluetooth adapters, etc.—to be detected again.
2. Where can I find “Scan for Hardware Changes”?
You can find it in the Device Manager:
Start Menu > Device Manager > Action > Scan for hardware changes
3. Does “Scan for Hardware Changes” eliminate the need to restart the PC?
Yes, in many cases, this feature detects new hardware and reloads drivers without requiring a system restart.
4. What should I do if a USB device is not being detected?
First, run Scan for Hardware Changes. If that still doesn’t work, try the following:
Switch to a different USB port
Update the driver
Check the cable
Restart the PC
5. Does this feature work in both Windows 10 and Windows 11?
Yes, this feature is available in Windows 10, Windows 11, and many older versions of Windows.
6. How do I scan for hardware using the Command Prompt?
Open the Command Prompt (CMD) as an Administrator and run the following command:
“`cmd
pnputil /scan-devices
“`
7. What should I do if a new SSD or Hard Drive is not showing up?
First, run Scan for Hardware Changes. Then, open Disk Management to check whether the drive has been initialized or assigned.
8. Does scanning delete any data?
No, it merely re-detects hardware devices. It does not delete any data.
9. My Bluetooth option has disappeared; will this feature help?
Yes, often the Bluetooth adapter can be detected again using this feature. If it is not detected, try reinstalling the driver.
10. What to do if the device does not appear even after scanning?
Reinstall the driver
Run Windows Update
Check the BIOS
Check hardware cables/connectivity
Test the device on another PC